
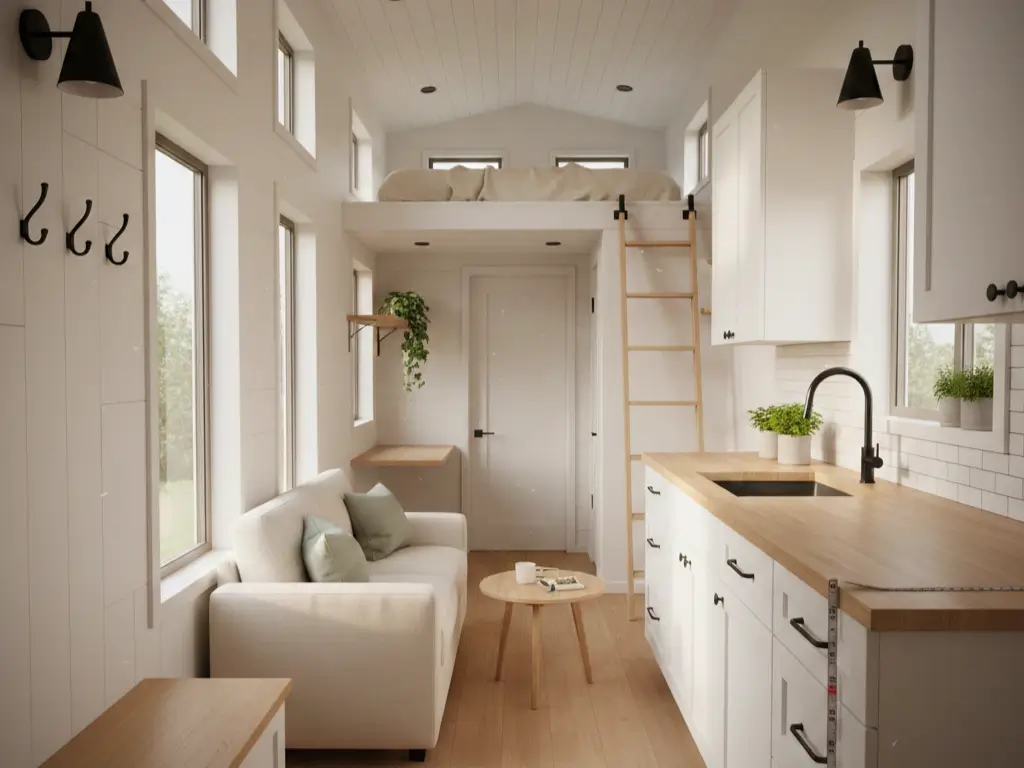
The difference between a cramped tiny house and a comfortable one rarely comes down to square footage. I’ve walked through 180 sq ft homes that felt open and relaxed. I’ve also felt claustrophobic in 350 sq ft spaces with poor layouts. The floor plan makes or breaks everything.
Your tiny house layout floor plan determines how you move, work, sleep, and live, often more than the actual size. A well-designed 200 sq ft tiny house can outperform a poorly planned 400 sq ft one in daily livability.
The best layouts prioritize traffic flow over aesthetics. That gorgeous Pinterest layout with the clawfoot tub in the center? It probably blocks the path between kitchen and bathroom by 8 inches, enough to make daily life frustrating.
Whether you’re building on a trailer (typically 8.5 ft × 20-28 ft) or a foundation (up to 400 sq ft), these principles apply. Budget-wise, you’re looking at $0 for DIY planning with graph paper, $200-$800 for professional plan modifications, or $2,000-$5,000 for fully custom architectural drawings. The planning phase is where your money goes furthest.
What Makes a Tiny House Floor Plan Work in Under 400 Sq Ft?
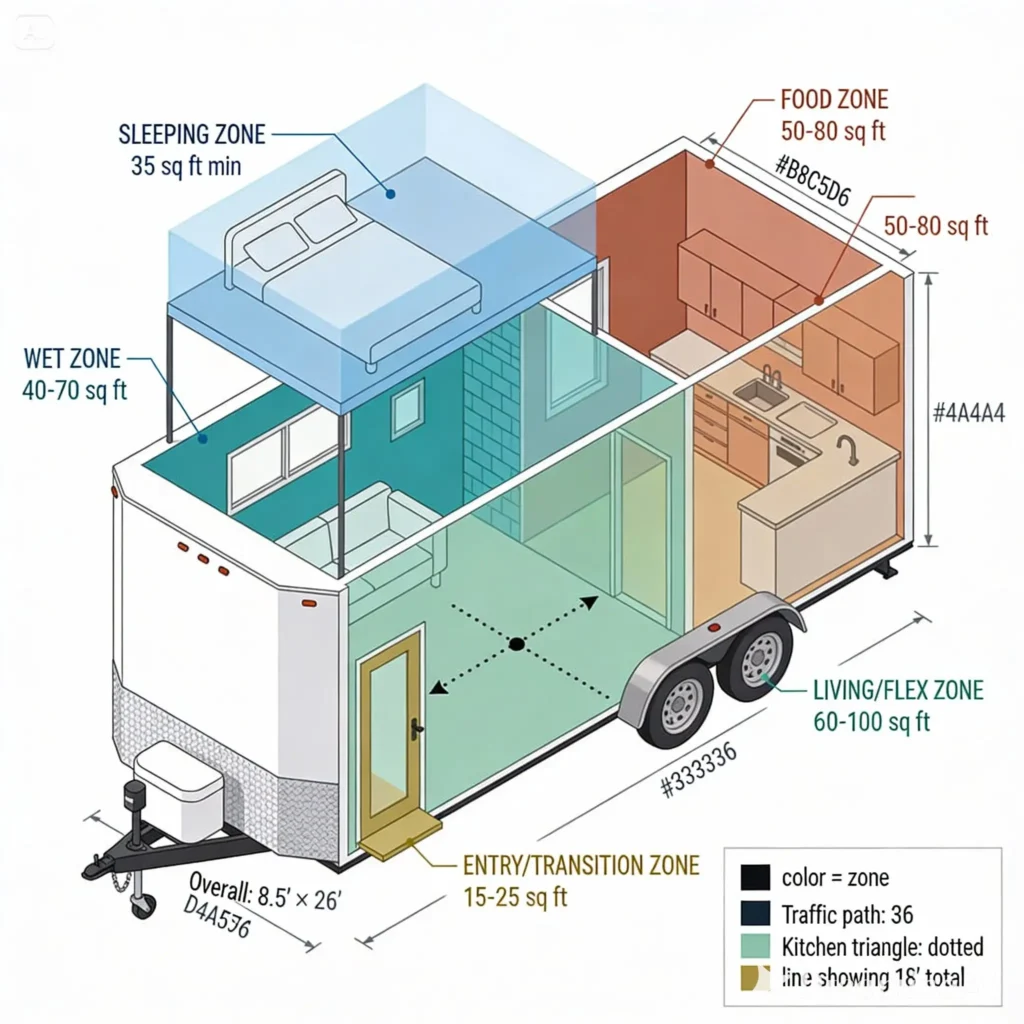
Successful tiny house layouts use zone-based design rather than room-based thinking. Instead of separate rooms, you create 3-5 functional zones that share space and often transform throughout the day. The key measurements: 36-inch minimum traffic paths, 24-inch clearance at workstations, and at least one 6 ft × 6 ft “breathing room” open area.
Traditional home design assigns one room per function, bedroom, kitchen, living room, office. That approach fails under 400 sq ft. You simply don’t have the square footage to dedicate spaces to single purposes.
Zone-based planning flips this thinking. You design around activities that happen at different times, allowing zones to overlap.
The 5 Essential Tiny House Zones:
- Sleeping Zone (minimum 35 sq ft for queen, 25 sq ft for full)
- Wet Zone (bathroom + kitchen plumbing ideally share a wall: 40-70 sq ft combined)
- Food Zone (prep, cook, eat: 50-80 sq ft)
- Living/Flex Zone (the multipurpose heart: 60-100 sq ft)
- Entry/Transition Zone (often overlooked: 15-25 sq ft)
The magic happens where zones overlap. Your living zone might share space with your sleeping zone via a murphy bed. Your food zone might expand into your living zone during meals. This overlap is intentional, not a compromise.
When planning your tiny house furniture guide, choose pieces that serve these zone transitions. A dining table that works as a desk. A couch that converts to guest sleeping. Every furniture piece should serve at least two zones.
I’ve found that measuring your current activities helps tremendously. Track where you spend time for one week. You might discover you need 8 sq ft of dedicated reading space but only 4 sq ft for bill-paying. This data shapes your layout better than any template.
How Do You Choose Between Loft vs Single-Level Tiny House Layouts?
Loft layouts maximize floor space by stacking the sleeping zone overhead (adding 30-50 usable sq ft below), best for occupants under 50 who can climb ladders daily. Single-level layouts cost 10-15% more per sq ft but improve accessibility and aging-in-place potential. Budget difference: lofts save $3,000-$8,000 in total build cost.
This decision affects everything downstream, your tiny house bedroom design, heating strategy, and daily quality of life.
Loft Layout Pros:
- Reclaim 35-60 sq ft of floor space below
- Creates psychological separation between sleep and living
- Lower build cost (less foundation/trailer length needed)
- Natural heat rises, warm sleeping in winter
Loft Layout Cons:
- Ceiling height typically 3-4 ft (sitting up requires planning)
- Ladder climbing 2-4 times daily minimum
- Difficult to make beds (knee clearance issues)
- Poor accessibility for mobility limitations
Single-Level Layout Pros:
- Full standing height everywhere
- Accessible design (meets ADA clearances if planned)
- Easier daily movement, no climbing
- Simpler HVAC distribution
Single-Level Layout Cons:
- Requires 15-25% more total square footage
- Less psychological separation between zones
- Higher cost per function
- May need creative tiny house storage solutions to compensate
Decision Matrix:
| Factor | Loft Better | Single-Level Better |
| Age under 50 | ✓ | |
| Mobility concerns | ✓ | |
| Budget under $50K | ✓ | |
| Ceiling height priority | ✓ | |
| Kids or pets | ✓ | |
| Aging in place plan | ✓ | |
| Under 200 sq ft total | ✓ | |
| 300-400 sq ft available | ✓ |
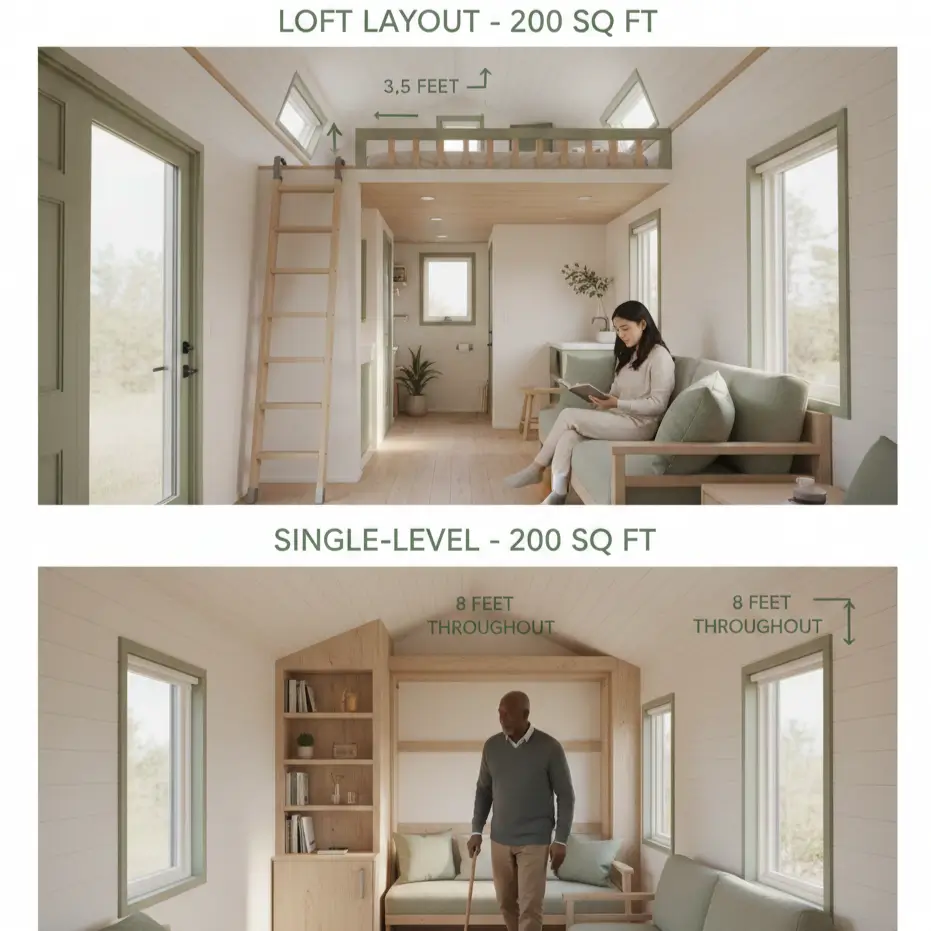
My recommendation: If you’re under 45 and building on a trailer (8.5 ft × 24 ft or smaller), a loft layout typically makes sense. If you’re building on a foundation with 300+ sq ft available, single-level often delivers better daily livability.
For climate considerations that affect this choice, check the climate-specific tiny house design guide, loft heat buildup in southern climates requires serious ventilation planning.
7 Proven Tiny House Floor Plan Layouts (With Measurements)
The most successful layouts include the “Galley” (8.5 × 20 ft), “L-Kitchen” (8.5 × 24 ft), “Open Loft” (8.5 × 28 ft), “Gooseneck” (8.5 × 32 ft with trailer hitch bedroom), “Studio Single-Level” (16 × 20 ft foundation), “Two-Zone Foundation” (20 × 20 ft), and “Accessible Ranch” (16 × 25 ft). Each serves different household sizes and mobility needs.
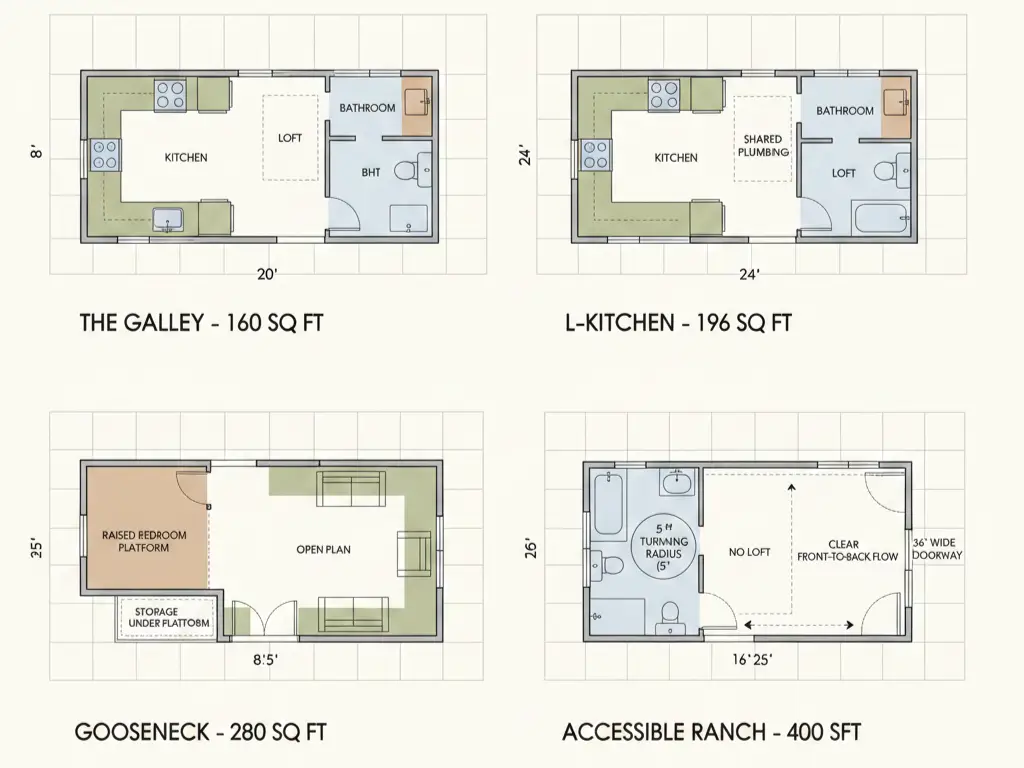
Layout 1: The Galley (160 sq ft)
Dimensions: 8 ft × 20 ft
Best for: Solo dwellers, weekend retreats
Budget range: $25,000-$40,000 DIY, $45,000-$65,000 professional
Everything lines up along two parallel walls. Entry at one end, sleeping loft above bathroom at the other. Kitchen runs 8 ft along one wall.
Zone breakdown:
- Entry/Living: 6 × 8 ft (48 sq ft)
- Kitchen galley: 3 × 8 ft (24 sq ft)
- Bathroom: 4 × 6 ft (24 sq ft)
- Loft sleeping: 7 × 8 ft (56 sq ft overhead)
This layout forces you into minimalist living philosophy. Every item must earn its space.
Layout 2: The L-Kitchen (196 sq ft)
Dimensions: 8.5 ft × 24 ft
Best for: Couples, cooking enthusiasts
Budget range: $35,000-$55,000 DIY, $55,000-$80,000 professional
The L-shaped kitchen creates a triangle workflow while opening up living space. Bathroom tucks behind kitchen, sharing the plumbing wall, this bathroom design approach saves $800-$1,500 in plumbing costs.
Layout 3: The Open Loft (220 sq ft)
Dimensions: 8.5 ft × 28 ft
Best for: Work-from-home singles/couples
Budget range: $45,000-$70,000 DIY, $70,000-$100,000 professional
Extended length allows for a dedicated office nook (4 × 5 ft = 20 sq ft) between living and kitchen zones. The work-from-home tiny house setup becomes viable with this extra length.
Layout 4: The Gooseneck (280-320 sq ft)
Dimensions: 8.5 ft × 32-36 ft (with gooseneck trailer)
Best for: Couples, families with one child
Budget range: $55,000-$85,000 DIY, $90,000-$130,000 professional
The gooseneck trailer hitch creates a raised platform perfect for the master bedroom. This separates sleeping from living without needing a ladder-access loft.
Platform height: typically 4-5 ft
Platform dimensions: 8 × 8 ft (64 sq ft)
Headroom on platform: 5-6 ft (sitting height)
Storage underneath the platform: 200+ cubic feet, equivalent to a walk-in closet. For tiny house on wheels specifications, the gooseneck design maximizes legal road dimensions.
Layout 5: Studio Single-Level (320 sq ft)
Dimensions: 16 ft × 20 ft on foundation
Best for: Singles/couples prioritizing accessibility
Budget range: $60,000-$95,000 DIY, $95,000-$150,000 professional
Foundation-built tiny houses can exceed the 8.5 ft road-legal width. This 16 ft width transforms layout possibilities entirely.
No loft needed, murphy bed or convertible sofa handles sleeping. Full 8 ft ceilings throughout. Wheelchair-accessible when designed with accessibility considerations (36-inch doorways, 5 ft turning radius in bathroom).
Layout 6: Two-Zone Foundation (400 sq ft)
Dimensions: 20 ft × 20 ft
Best for: Couples, work-from-home, aging in place
Budget range: $80,000-$120,000 DIY, $130,000-$190,000 professional
The maximum tiny house threshold (400 sq ft) allows true zone separation. A half-wall or sliding barn door creates private sleeping and public living zones.
This layout supports a full-size kitchen with standard appliances, no apartment-size compromises. The kitchen design options expand dramatically at this size.
Layout 7: Accessible Ranch (400 sq ft)
Dimensions: 16 ft × 25 ft
Best for: Mobility needs, aging in place, families with special considerations
Budget range: $90,000-$140,000 DIY, $150,000-$220,000 professional
Longer and slightly narrower than the two-zone, this layout creates a clear front-to-back flow. All zones sit on one level with zero-threshold entries and curbless shower.
For households considering future mobility needs, this layout accommodates neurodivergent design considerations and wheelchair access without feeling clinical.
How to Plan Traffic Flow in Your Tiny House Layout
Traffic flow in tiny houses requires 36-inch minimum pathways for primary routes (bathroom to kitchen, entry to living), 24-inch minimum for secondary routes, and zero blocked paths between daily-use zones. The “golden triangle” between stove, sink, and refrigerator should measure 12-23 ft total perimeter.
I’ve seen beautiful tiny houses that frustrate their owners daily. The common thread? Traffic flow problems.
Poor flow happens when:
- You must step sideways to pass between kitchen and bathroom
- Opening the refrigerator door blocks the entry
- Two people can’t occupy the kitchen simultaneously
- Reaching the bed requires walking through another zone
The 36-24-12 Rule:
- 36 inches: Primary traffic paths (entry → living → bathroom minimum)
- 24 inches: Secondary paths (around furniture, work clearances)
- 12 inches: Cabinet clearance minimum when doors are open
In a 170 sq ft trailer home, these clearances consume about 40 sq ft, roughly 25% of your floor space goes to movement. Planning this accurately prevents claustrophobia.
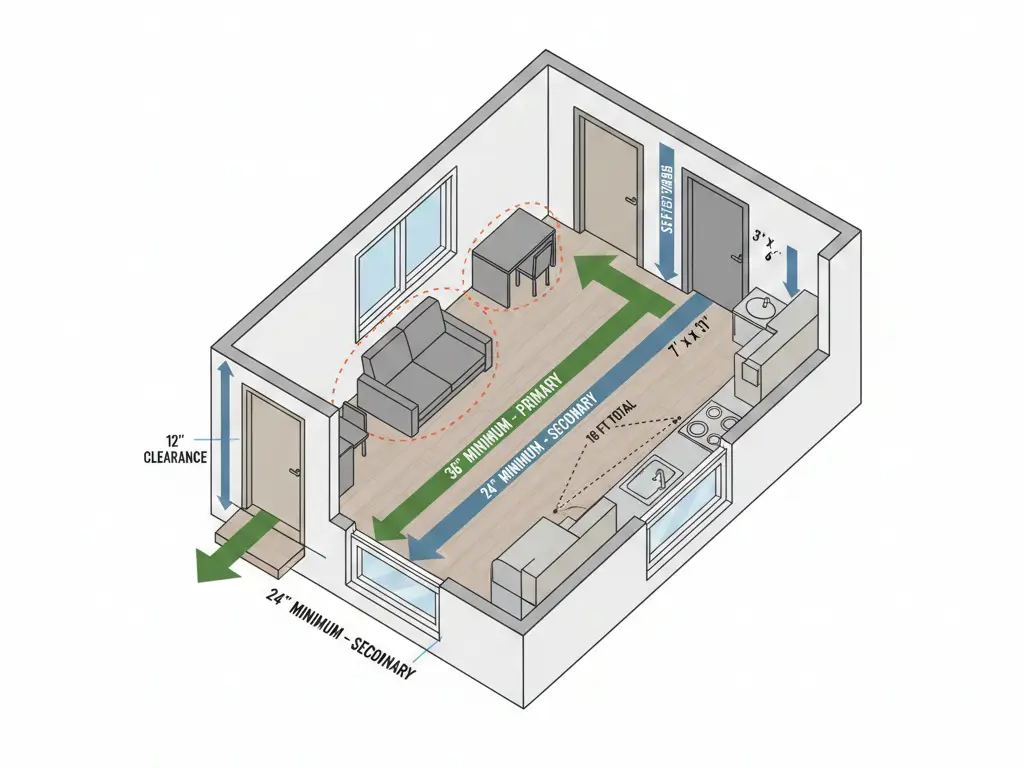
Kitchen Triangle Measurement:
The path between stove, sink, and refrigerator should total 12-23 ft when measured as a triangle. Under 12 ft creates cramped cooking. Over 23 ft wastes steps.
In tiny houses, this often becomes a “kitchen line” rather than triangle, and that’s fine. The 12-23 ft guideline still applies as total walking distance between the three stations.
For appliance placement details, the tiny house kitchen fixtures guide covers under-counter and space-saving options that maintain this flow.
Door Swing Planning:
Every door needs swing clearance. In tiny spaces, consider:
- Pocket doors (save 8-10 sq ft over swing doors)
- Barn-style sliding doors (save 6-8 sq ft)
- Curtains for closets/storage (save 100% of door footprint)
Your window and door specifications should account for both light needs and traffic impact.
Tiny House Floor Plan Mistakes That Waste Space
The five costliest layout mistakes: placing the bathroom at the home’s center (creates dead traffic zones), ignoring the “wet wall” principle (doubles plumbing costs), under-sizing entry transitions (creates bottlenecks), blocking natural light paths (requires more artificial lighting), and forgetting vertical storage integration (loses 30-50 cubic ft potential).
These mistakes show up in even professional plans. Catching them during planning saves thousands.
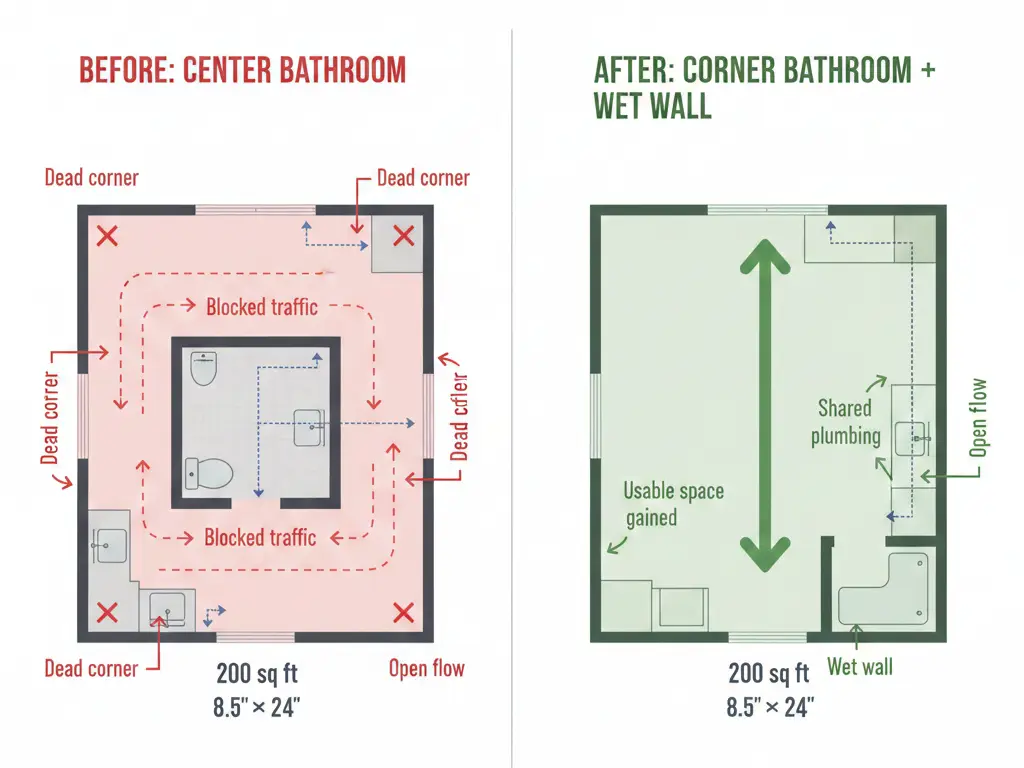
Mistake 1: Center-Located Bathroom
Putting the bathroom in the middle of your floor plan feels logical, equal distance from everywhere. In practice, it creates awkward traffic patterns around all sides.
Better approach: Push the bathroom to one end or corner. Share a wet wall with the kitchen to reduce plumbing runs. This typically saves $500-$1,200 in plumbing system costs.
Mistake 2: Ignoring the Wet Wall Principle
Every plumbing fixture needs water supply and drain lines. Spreading fixtures across multiple walls multiplies plumbing complexity.
The wet wall solution: Align kitchen sink, bathroom sink, toilet, and shower on one shared wall or two adjacent walls. In a 200 sq ft tiny house, this consolidation saves 15-20 linear feet of pipe.
Mistake 3: No Entry Transition Zone
Walking directly from outside into your living space tracks dirt and removes the psychological transition into “home.”
Minimum entry zone: 15 sq ft (3 × 5 ft) with storage for coats and shoes. This feels like lost space until you live without it. Include hooks at 60 inches height for adults, 36 inches for accessibility or children.
Mistake 4: Blocking Natural Light
Tall furniture or loft positioning that blocks window light forces daytime artificial lighting use.
The fix: Map your window locations first. Keep sight lines from windows clear across at least 60% of your floor plan. Your lighting solutions budget drops when natural light works harder.
For paint strategies that maximize this natural light, see the guide on brightening dark apartments with paint.
Mistake 5: Forgetting Vertical Storage
Floor space is precious. Wall space is often wasted.
Vertical integration: Build storage into every wall at 72-84 inches height. A 20 ft long tiny house with 8 ft ceilings can incorporate 160 sq ft of high wall storage, equivalent to adding 50% more floor space in storage terms.
The storage solutions guide covers vertical optimization in detail.
Your Next Steps for Tiny House Layout Planning
The best tiny house floor plan isn’t the prettiest Pinterest image. It’s the one where you can move from bed to bathroom to coffee maker without thinking about obstacles.
- Sketch your current daily movement patterns. Where do you walk first in the morning? Where do bottlenecks occur? This 15-minute exercise reveals your true traffic flow needs.
- Measure your current home’s functional zones. How much space do you actually use for cooking? Sleeping? Working? These real numbers should guide your tiny layout, not theoretical minimums.
- Visit at least two tiny houses in person. Online photos can’t convey how 4 ft of loft ceiling height actually feels. Most tiny house communities offer tours, search for events within 100 miles of your location.
The Veniola tiny house resource collection covers every aspect of small-space design, from flooring installation to budget planning. Bookmark it for your planning journey.
Your floor plan sets the foundation for everything else, get it right, and the rest follows.