When I first looked at the blueprints for a 280-square-foot tiny house on wheels, one number scared me more than the budget: 8.34 pounds. That is how much a single gallon of water weighs.
If you install a standard 50-gallon water heater and a 40-gallon fresh water tank, you have just added over 750 pounds of dynamic weight to your trailer, and that’s before you even turn on a faucet. In a traditional home, plumbing is hidden and forgotten. In a tiny house, your plumbing system defines your floor plan, your winter resilience, and your trailer’s balance.
Whether you are building a stationary ADU or a mobile tiny home, standard residential plumbing rules often don’t apply. You need a hybrid approach that blends RV flexibility with residential durability. This guide covers everything from PEX tubing to greywater management, suitable for budgets ranging from a $600 DIY setup to a $2,500 professional installation.
The Foundation: Understanding Your Water Source
Your water source dictates your system design. Grid-tied systems connect directly to a hose bib or sewer (like a standard RV). Off-grid systems rely on freshwater tanks (typically 30-40 gallons) and 12V pumps. A Hybrid system uses valves to switch between tank water and pressurized city water.
The Hybrid System Strategy
For most tiny house owners, a hybrid system is the smartest investment. It gives you the freedom to park off-grid on BLM land or hook up at a developed RV park.
Here is the basic flow for a hybrid setup in a space under 400 sq ft:
- Inlet: A standard potable water hose connects to a city water entry dish on the exterior.
- Diverter Valve: A simple brass valve directs water either directly to your fixtures (bypassing the pump) or into your fresh water tank.
- The Tank: usually a 30-to-46-gallon polyethylene tank placed over the axles for weight balance.
- The Pump: A 12V diaphragm pump (like a Shurflo 4008) pushes water from the tank when you aren’t hooked up to a hose.
If you are planning your tiny house on wheels specifications, remember to center that water tank. A full 40-gallon tank sloshing around in the far rear of your trailer can cause dangerous sway while towing.
Pro Tip: Always install a check valve on the city water connection. Without it, your 12V pump might accidentally pump your precious tank water back out into the city supply line.
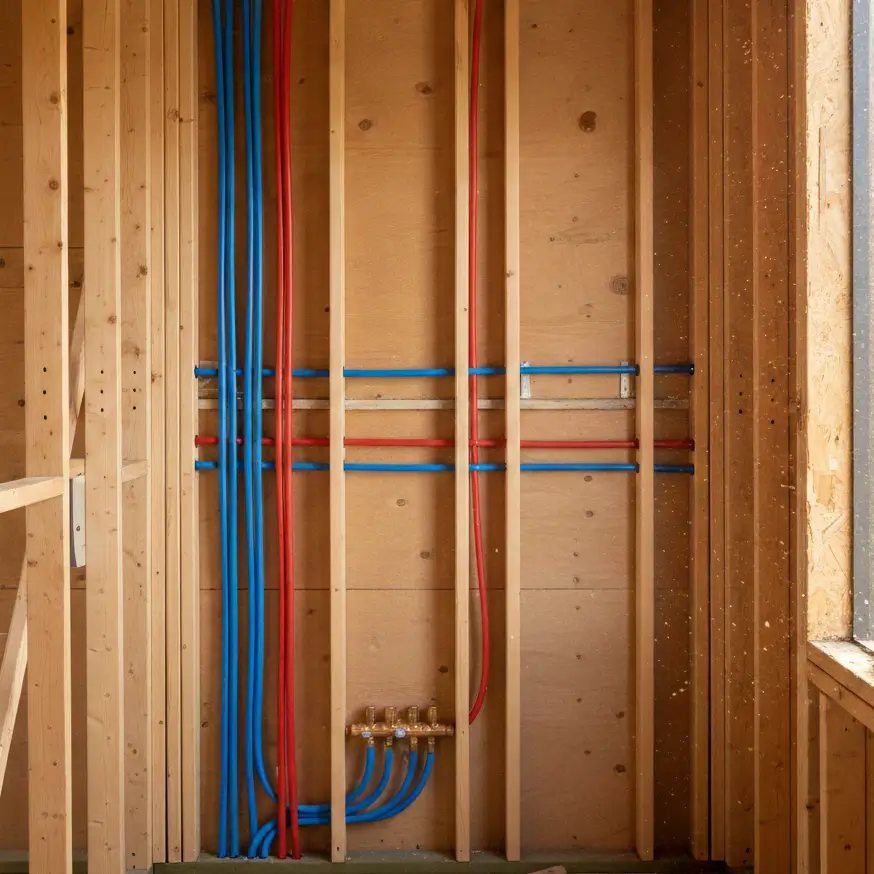
Pipe Selection: Why PEX Wins Every Time
Cross-linked Polyethylene (PEX) is the industry standard for tiny homes. It is flexible, freeze-resistant, and cheaper than copper. For a tiny house, use 1/2-inch PEX for main lines and supply branches. It costs roughly $0.30 per foot, making it incredibly budget-friendly.
PEX-A vs. PEX-B
When walking the aisles of the hardware store, you will see two main types of PEX tubing.
- PEX-B (The Standard): Uses crimp rings and a crimping tool. It is slightly stiffer. The fittings go inside the pipe, which can slightly reduce water flow, but for a tiny house with short runs (under 30 feet), you won’t notice a pressure drop. The tool costs about $50-$70.
- PEX-A (The Expansion Type): Uses an expansion tool to stretch the pipe over the fitting. It has “memory,” meaning if it kinks, you can heat it up and it repairs itself. It offers better freeze protection because it can expand significantly. However, the expansion tool is pricey ($350+).
For a DIY build on a budget, PEX-B is perfectly adequate. The flexibility is vital because tiny houses on wheels vibrate during transit. Rigid copper pipes can crack at the solder joints after a few hundred miles on the highway. PEX absorbs that vibration.
The “Wet Wall” Layout
To save money and reduce the risk of leaks, design your tiny house layout using a “Wet Wall” or “Wet Corner.”
This means placing your kitchen sink and bathroom on opposite sides of the same wall.
- Benefit 1: You use 50% less pipe.
- Benefit 2: All your plumbing is in one cavity, making insulation and repairs easier.
- Benefit 3: You only need one vent stack going through the roof.
Hot Water: Tank vs. Tankless
For spaces under 400 sq ft, tankless water heaters are the standard choice. They save 12-16 cubic feet of space compared to a tank. Propane tankless units are popular for off-grid capacity, while electric tankless units require significant amperage (60A+) and are better for grid-tied homes.
The Propane Advantage
In my experience, a propane on-demand heater is the best bet for mobile tiny houses. Units like the Excel or Marey utilize standard 20lb propane tanks (the BBQ grill size).
- Dimensions: Roughly 12″ x 15″ x 5″.
- Venting: Requires a 4″ double-wall flue through the roof or side wall.
- Cost: $200 – $600 depending on flow rate (GPM).
If you choose electric tankless, you must consult your tiny house electrical systems plan. A decent electric heater draws 50-80 amps. If your tiny house only has a 50-amp RV service, turning on the hot water will trip your main breaker immediately.
Drainage: Greywater and Black Water
“Greywater” is from sinks and showers. “Black water” is from toilets. In tiny houses, managing these streams separately is crucial. Most tiny housers use a composting toilet to eliminate black water entirely, simplifying the plumbing system to just greywater management.
The Composting Solution
Installing a flush toilet in a tiny house requires a black water holding tank (like an RV). This adds weight, smell, and the unpleasant task of visiting dump stations.
By installing a composting toilet (Nature’s Head, Separett, or a DIY bucket system), you remove sewage from the equation. This allows you to focus solely on greywater. See our guide on tiny house bathroom fixtures for specific toilet models.
Designing the Greywater Drain
Even without a toilet, you need to drain your sink and shower.
- Pipe Size: Use 1.5-inch or 2-inch PVC or ABS pipe. Do not use 1-inch pipe for drains; it clogs too easily.
- Slope: You must maintain a slope of 1/4 inch per foot. If the slope is too steep, water runs away leaving solids (soap scum/food) behind. If it’s too flat, it won’t drain.
- The P-Trap: Every drain needs a P-trap to prevent sewer gases (or tank smells) from entering the home.
- Venting: Just like a large house, drains need air to flow. Since you don’t have walls for massive vent stacks, use an Air Admittance Valve (AAV) under the sink. This little $20 device lets air in but stops smells from getting out, saving you from cutting holes in your roof.
Winterization: Protecting Pipes in Thin Walls
Tiny house walls are often only 3.5 inches thick (2×4 framing). This offers less insulation buffer than a standard house. All plumbing should ideally run inside the conditioned envelope (inside cabinets or along the floor), not inside the exterior walls.
If you must run pipes in an exterior wall or under the trailer floor, insulation is non-negotiable.
The 3-Step Defense Against Freezing
- Interior Routing: If possible, run your PEX lines through the bottom of your kitchen cabinets and vanity. This keeps them at room temperature.
- Heat Tape: For any pipes under the trailer, wrap them in electric heat tape (thermostat controlled) before insulating. This typically costs $40-$80.
- Insulation: Consult our tiny house insulation guide. For under-trailer pipes, use foam pipe insulation sleeves, then wrap the whole bundle in foil-faced bubble wrap or enclose it in a rigid foam box.
DIY Installation: A Step-by-Step Breakdown
A DIY PEX plumbing job typically costs $400-$800 in materials. Plan your layout on paper first. Dry-fit all connections before crimping. Always pressure test with air (50 PSI) before filling with water to catch leaks without making a mess.
Essential Tools List
- PEX Crimp Tool (for PEX-B) or Expansion Tool (for PEX-A)
- PEX Cutter (don’t use a saw; you need a clean cut)
- Go/No-Go Gauge (to check crimp accuracy)
- Drill with spade bits (for drilling through studs)
The Install Process
- Rough-In: Drill holes in your studs or cabinets. Run the PEX lines from the supply inlet to the fixture locations. Leave 6-10 inches of extra PEX at each end.
- Manifold Construction: Create a central hub where the main water line splits to the hot water heater, cold kitchen, cold bath, etc. You can buy pre-made copper manifolds or build one with PEX tees.
- Connections: Cut the PEX to length. Slide on the crimp ring. Insert the fitting. Crimp. Check with the gauge.
- Pressure Test: Cap all the pipe ends. Connect an air compressor to the system and pressurize to 50 PSI. Leave it for 24 hours. If the gauge reads 50 PSI the next day, you are leak-free.
Sizing Your Components
When space is tight, every inch counts. Here are the common dimensions you need to account for when designing your tiny house kitchen design and bathroom.
| Component | Dimensions (Approx) | Space/Location Tip |
| Fresh Tank (46 gal) | 35″ L x 14″ W x 18″ H | Ideally under a sofa or bed, centered over axles. |
| Water Pump | 8″ x 5″ x 4.5″ | mount next to the tank with a silencing pad. |
| Accumulator Tank | 5″ Diameter x 9″ H | Needs to be near the pump; stops pump “cycling.” |
| Propane Heater | 14″ W x 24″ H x 6″ D | Wall-mounted. Needs clear vertical wall space. |
| PEX Manifold | 12″ – 18″ Length | Hide inside a vanity cabinet or utility closet. |
Sustainability and Greywater Recycling
For the eco-conscious builder, your plumbing system offers a chance to reduce your footprint. Since tiny houses use less water naturally, managing output is easier.
You can divert your kitchen sink and shower water to a simple mulch basin in the garden (check local codes). This requires a 3-way valve under the trailer: one direction goes to the sewer hookup, the other goes to a garden hose adapter.
This integrates well with off-grid tiny house systems, allowing you to return nutrients to the soil rather than sending them to a treatment plant. Just be sure to use biodegradable soaps!
Budget Analysis: What Will It Cost?
Prices fluctuate, but here is a realistic breakdown for a 2024 DIY build:
- PEX Pipe & Fittings: $250
- 12V Pump & Strainer: $75 – $120
- Fresh Water Tank: $100 – $180
- Tankless Heater (Propane): $200 – $500
- PVC Drainage: $80
- Fixtures (Faucets/Sinks): $300+ (variable)
Total DIY Cost: $1,005 – $1,500
Compared to hiring a professional plumber ($85/hour + materials), doing this yourself can save you upwards of $2,000. Just remember that water damage is the number one enemy of tiny homes. If you aren’t confident in your crimps, hire a pro to inspect your work before closing the walls.
Final Thoughts
Tiny house plumbing systems are about balancing convenience with constraints. You don’t need a massive boiler or endless hot water to live comfortably. By using PEX, centralizing your wet layout, and carefully choosing between composting and flush systems, you can build a robust system that fits your square footage, and your budget.
Ready to start drilling holes? Check your tiny house budget planning to allocate funds for quality brass fittings (avoid plastic fittings if you can), and don’t forget to visit our guide on tiny house building projects for more hands-on tutorials.
For more on creating a beautiful space around your functional systems, explore tiny house style aesthetic at Veniola.com.