
The average American bathroom takes up 50-60 square feet. In a tiny house, you might have 20. That’s not a limitation, it’s a design challenge with genuinely elegant solutions.
A well-designed tiny house bathroom delivers full functionality in 15-40 square feet, costing between $800 for a DIY wet bath and $12,000 for a custom dry bathroom with premium fixtures.
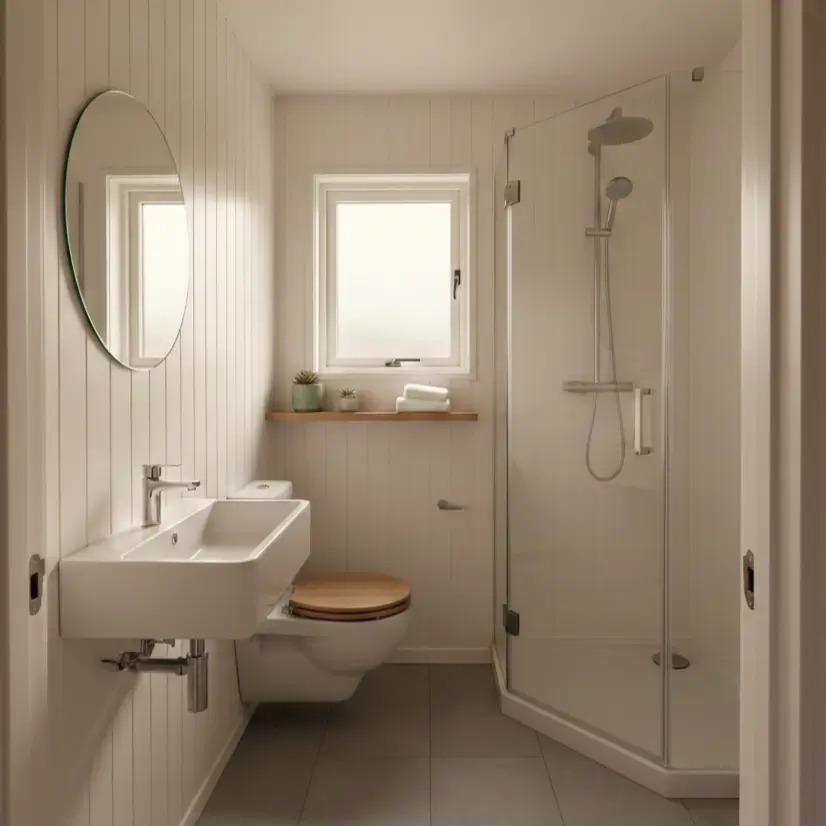
Here’s what makes tiny bathroom design different from just “making things smaller.” Standard bathroom advice assumes you have room for a 60-inch vanity and a separate tub. You don’t. You’re working with a footprint roughly the size of a walk-in closet, and you need it to handle toilet, sink, and shower functions daily.
I’ve helped design bathrooms in tiny houses ranging from 180 to 400 square feet over the past eight years. The failures I’ve seen share one common thread: owners tried to shrink conventional bathrooms instead of rethinking them completely.
This guide covers exact dimensions you’ll need, the wet bath versus dry bath decision, fixtures that actually fit, and five layouts proven to work. You’ll walk away knowing precisely what fits your space, and what doesn’t.
What Size Should a Tiny House Bathroom Be?
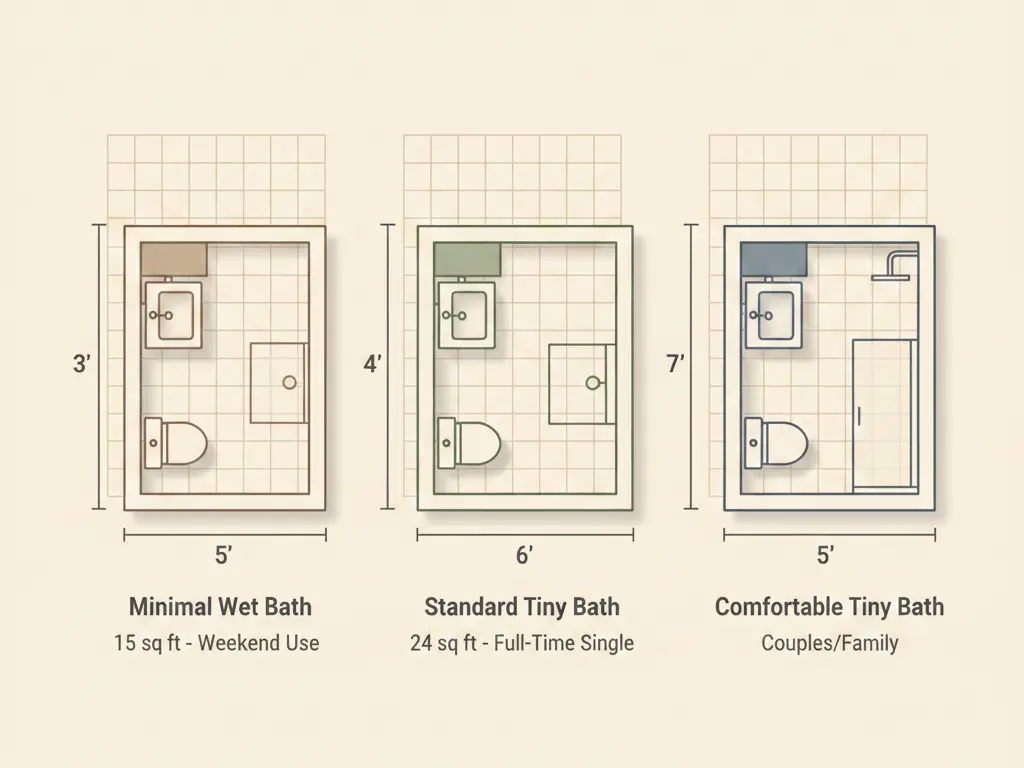
Most functional tiny house bathrooms range from 20-35 square feet. The absolute minimum for a wet bath (combined shower and toilet area) is around 15 square feet. A dry bathroom with separate shower needs at least 30-40 square feet. Your lifestyle, full-time living versus weekend use, should drive this decision more than minimums.
Let me be direct: building codes and practical function often disagree here.
The International Residential Code technically allows bathrooms as small as 15 square feet, provided you meet clearance minimums. But living with 15 square feet daily? That’s a different story.
Here’s how bathroom size breaks down by use pattern:
| Living Situation | Minimum Size | Recommended Size | Key Features |
| Weekend/vacation use | 15-18 sq ft | 20-25 sq ft | Wet bath acceptable |
| Full-time single | 20-25 sq ft | 28-35 sq ft | Wet or dry bath |
| Full-time couple | 25-30 sq ft | 35-45 sq ft | Dry bath preferred |
| Family with kids | 30-40 sq ft | 40-50 sq ft | Dry bath essential |
The measurements that actually matter:
- Toilet clearance: 15 inches minimum from center to any wall or fixture (21 inches is more comfortable)
- Shower floor: 30×30 inches minimum, 32×32 inches standard, 36×36 inches for comfort
- Sink approach: 21 inches from front of sink to any obstruction
- Door swing: 32 inches clear for a standard swing door; pocket or barn doors save 6-8 square feet
When planning your tiny house layout and floor plan, remember that bathroom placement affects your entire plumbing run. Keeping the bathroom near the kitchen saves hundreds in installation costs.
A Portland couple I worked with initially planned a 35-square-foot dry bathroom. After realizing it would consume nearly 20% of their 200-square-foot house, they switched to a 22-square-foot wet bath. Two years in, they report zero regrets.
Wet Bath vs Dry Bath: Which Works for Your Tiny House?
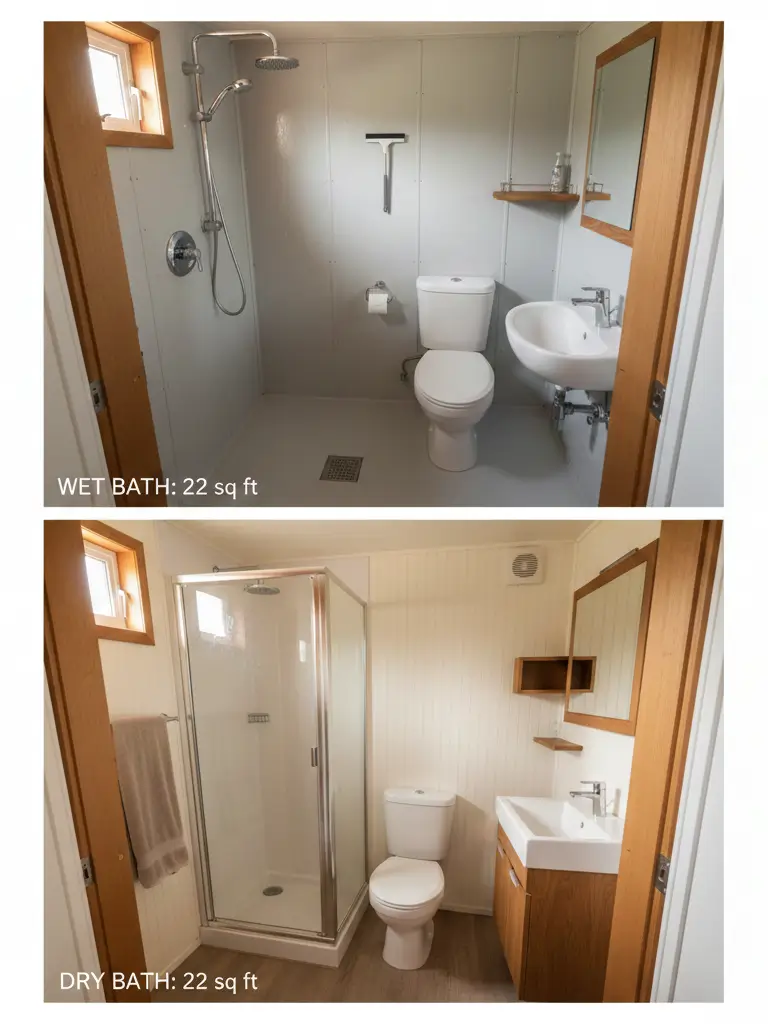
Wet baths combine shower and toilet in one waterproof room (15-25 sq ft), costing $800-$3,000. Dry baths separate the shower with a stall or curtain (30-45 sq ft), running $2,500-$12,000. Wet baths make sense for full-time living under 250 square feet; dry baths work better for larger builds, families, or anyone uncomfortable with toilet moisture.
This decision affects your daily experience more than almost any other bathroom choice.
Wet Bath Advantages:
A wet bath treats the entire room as a shower stall. The floor slopes toward a central drain. Everything, toilet, sink, sometimes even storage, is waterproof.
- Saves 10-15 square feet compared to equivalent dry bath
- Easier to clean (just spray everything down)
- Lower construction cost ($800-$3,000 typical)
- Works well for spaces under 25 square feet
- Common in RVs and boats, proven designs exist
Wet Bath Drawbacks:
The downsides are real:
- Toilet and toilet paper get wet unless you use a waterproof holder
- No dry towel storage in the room
- Feels cramped if you’re over 6 feet tall in a small footprint
- Some visitors find it uncomfortable
- Requires proper bathroom paint and moisture solutions
Dry Bath Advantages:
Dry baths give you a separate shower stall, even if it’s just a curtain and raised threshold.
- Familiar layout feels more like “home”
- Dry toilet area is more comfortable
- Better for couples with different showering schedules
- Easier resale (appeals to broader buyers)
- More storage options
Dry Bath Drawbacks:
- Requires 30-45 square feet minimum
- Higher build cost ($2,500-$12,000)
- More complex waterproofing at shower boundaries
- Takes more floor space from living area
If your total tiny house footprint is under 250 square feet, seriously consider a wet bath. Above 300 square feet, a dry bath becomes more practical. Between 250-300? It depends on your priorities.
Understanding your tiny house plumbing systems helps inform this choice. Wet baths often work better for off-grid builds because the simpler plumbing reduces failure points.
Essential Tiny House Bathroom Fixtures (That Actually Fit)
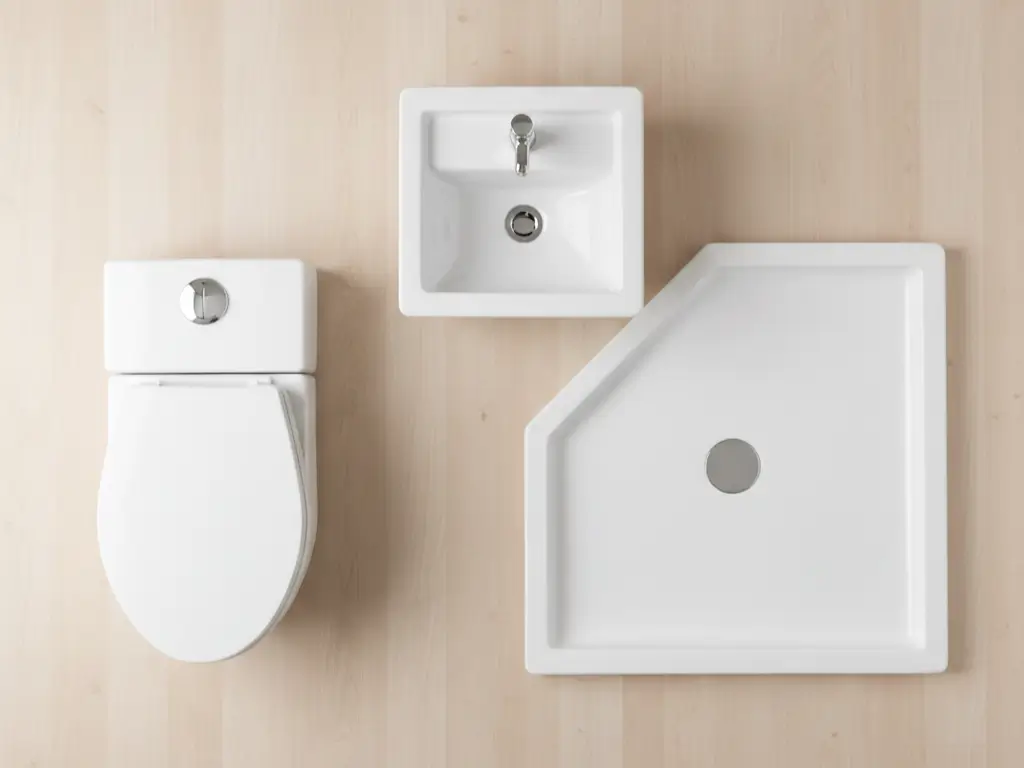
Compact toilets measure 24-27 inches deep versus 30 inches standard. Corner sinks range from 12-18 inches wide. Shower bases start at 30×30 inches. Expect to spend $150-$400 on a compact toilet, $80-$250 on a small sink, and $200-$600 on a tiny shower unit, or $900-$1,500 for a composting toilet if you’re going off-grid.
Standard fixtures don’t work. Period. A conventional toilet extends 30 inches from the wall. In a 4-foot-wide bathroom, that leaves 18 inches. Not enough.
Here’s what actually fits:
Toilets:
| Type | Dimensions (D x W x H) | Cost | Best For |
| Compact elongated | 24-27″ x 14″ x 15″ | $150-$400 | On-grid, comfort |
| Round bowl | 25-26″ x 14″ x 15″ | $100-$300 | Tight spaces |
| RV toilet | 18-20″ x 14″ x 13″ | $80-$200 | Trailers, budget |
| Composting (separating) | 20-22″ x 16″ x 20″ | $900-$1,500 | Off-grid living |
Composting toilets like the Nature’s Head ($960-$1,100) or Separett Villa ($989-$1,200) eliminate the need for black water tanks. That’s a significant consideration for your off-grid tiny house systems.
Sinks:
Corner sinks are your friend. A 12×12-inch corner unit takes almost no usable floor space. Wall-mounted sinks (18-24 inches wide) free up space below for storage.
- Corner sinks: 12-18 inches wide, $80-$250
- Wall-mount compact: 18-24 inches wide, $100-$400
- Vessel on narrow shelf: 14-16 inches round, $50-$200 (plus shelf)
Showers:
The minimum practical shower base is 30×30 inches, 32×32 is notably more comfortable. Neo-angle (corner) shower bases save a few inches. Tiny house bathroom fixtures designed for RVs often provide the best size-to-function ratio.
- Neo-angle base: 36×36″ corner footprint, $200-$500
- Square compact: 32×32″, $150-$400
- Wet bath floor pan: Custom, $300-$800
Budget Breakdown:
| Budget Tier | Toilet | Sink | Shower | Total Fixtures |
| DIY Budget | $80-$150 | $50-$100 | $150-$250 | $280-$500 |
| Mid-Range | $200-$400 | $150-$250 | $300-$500 | $650-$1,150 |
| Investment | $900-$1,500 | $300-$500 | $500-$1,200 | $1,700-$3,200 |
5 Space-Saving Tiny House Bathroom Layouts That Work
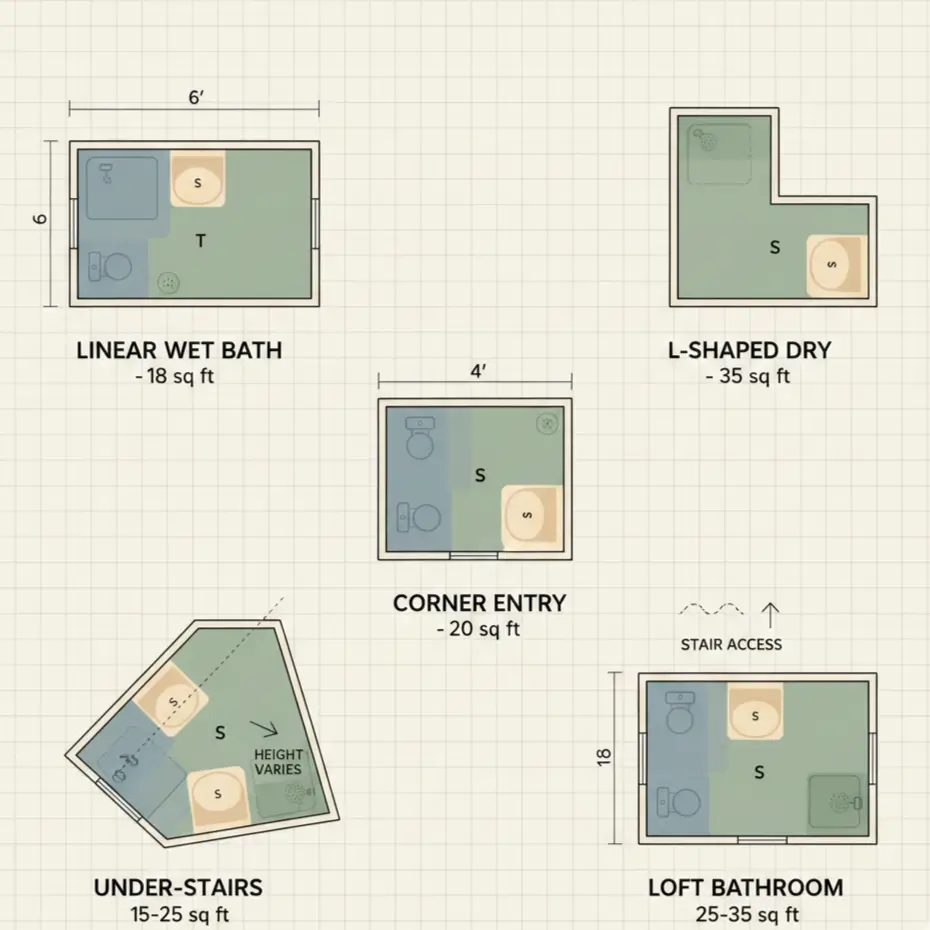
The five most effective tiny bathroom layouts are: linear wet bath (3×6 feet, 18 sq ft), L-shaped dry bath (5×7 feet, 35 sq ft), corner entry (4×5 feet, 20 sq ft), behind-the-stairs bathroom (variable, 15-25 sq ft), and loft bathroom (for tiny houses with second-floor space). Each layout optimizes a different priority, minimal footprint, accessibility, or privacy.
I’ve seen dozens of layouts fail. These five actually work in practice.
Layout 1: Linear Wet Bath (18 sq ft)
Dimensions: 3 feet wide x 6 feet deep
Everything lines up: toilet at the back, sink middle, shower encompasses the whole room. Works best for solo dwellers in houses under 200 square feet. Total build cost: $1,200-$2,500.
Layout 2: L-Shaped Dry Bath (35 sq ft)
Dimensions: 5 feet wide x 7 feet deep
Shower in one arm of the L, toilet and sink in the other. Provides visual separation and keeps the toilet area dry. This layout works well for couples and integrates nicely with your tiny house storage solutions by allowing built-in shelving above the toilet.
Layout 3: Corner Entry (20 sq ft)
Dimensions: 4 feet x 5 feet
Door at the corner maximizes usable wall space. Toilet on one wall, corner sink adjacent, shower on the remaining wall. Efficient for houses between 200-300 square feet.
Layout 4: Under-Stairs Bathroom (15-25 sq ft)
Variable dimensions based on stair pitch.
If your tiny house has a loft with stairs (not a ladder), the space beneath can house a surprisingly functional bathroom. Ceiling height ranges from 6’4″ at the tall end to 3 feet at the short end. Toilet goes under the high section, storage under the low. This approach connects well to overall tiny house bedroom design when the stairs lead to a sleeping loft.
Layout 5: Loft Bathroom (25-35 sq ft)
For houses with sufficient height, placing a compact bathroom in a loft (accessed by stairs) separates living and utility zones. This is advanced, ceiling height and structural support matter significantly. Review tiny house on wheels specifications if you’re considering this for a mobile build.
Real Example:
A Austin-based couple transformed a 22-square-foot corner entry wet bath. Before: toilet cramped against the door, no ventilation, constant moisture issues. After: relocated toilet to the back wall (gaining 8 inches of clearance), added a 12-inch corner sink, installed a proper exhaust fan. Total cost: $1,800 in materials plus a weekend of work.
Moisture, Ventilation & Material Choices for Tiny Bathrooms
Tiny bathrooms need 50 CFM minimum exhaust ventilation, moisture-resistant wall materials (FRP panels, PVC beadboard, or proper tile), and careful attention to insulation to prevent condensation. Material costs range from $200 for DIY FRP panels to $1,500+ for custom tile work. Climate zone significantly affects material choices.
This is where tiny bathrooms fail most often. Moisture destroys walls, creates mold, and makes the smallest room in your house feel unlivable.
Ventilation Requirements:
A bathroom under 50 square feet needs at least 50 CFM (cubic feet per minute) exhaust capacity. For wet baths, I recommend 80-100 CFM. Always vent to the exterior, never into the attic or wall cavity.
Fan cost: $30-$150 for the unit, $50-$200 for installation.
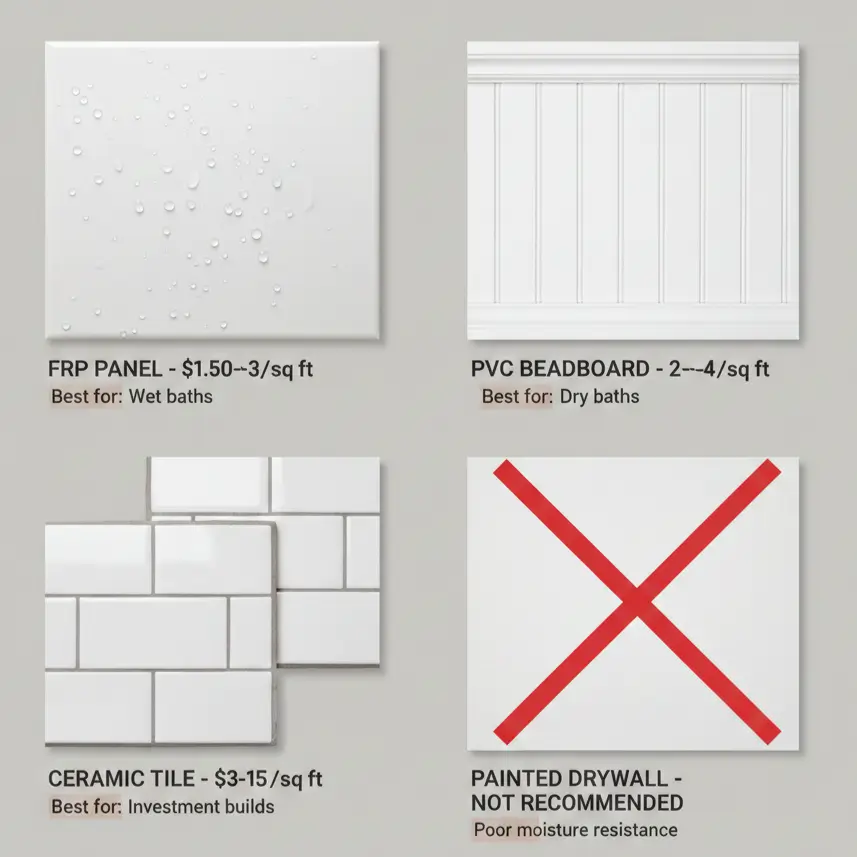
Wall Materials:
| Material | Cost per Sq Ft | Moisture Resistance | DIY Difficulty | Best For |
| FRP Panels | $1.50-$3 | Excellent | Easy | Wet baths, budget |
| PVC Beadboard | $2-$4 | Excellent | Easy | Dry baths, aesthetic |
| Tile | $3-$15 | Excellent | Moderate | Investment builds |
| Painted drywall | $0.50-$1.50 | Poor | Easy | NOT recommended |
Understanding proper tiny house wall materials and your tiny house insulation guide prevents the condensation problems that plague poorly designed tiny bathrooms.
Climate Considerations:
Cold climates need vapor barriers on the warm side of insulation. Hot-humid climates need them on the exterior side. Getting this wrong causes moisture to condense inside your walls.
For climate-specific tiny house design, your bathroom requires extra attention because it generates the most humidity per square foot.
Material Recommendations by Budget:
- DIY Budget ($200-$500): FRP panels, vinyl flooring, standard exhaust fan
- Mid-Range ($500-$1,500): PVC beadboard, ceramic tile floor, quiet exhaust fan
- Investment ($1,500-$4,000): Tile walls and floor, heated floor mat, premium ventilation
Making Your Tiny Bathroom Work Long-Term
The bathroom might be the smallest room in your tiny house, but it affects daily comfort more than its square footage suggests.
- Measure your actual space and sketch the footprint. Include door swing and clearances, not just the walls. Use the dimension guidelines above.
- Decide wet bath versus dry bath based on your lifestyle, not just the space savings. Visit an RV dealer to physically experience both styles.
- Over-engineer moisture protection. Double-check ventilation CFM. These steps cost little upfront but prevent expensive fixes later.
A well-designed 25-square-foot bathroom functions better than a poorly designed 50-square-foot one. For more guidance on creating functional small spaces, explore the full tiny house living resources at Veniola.
Your bathroom doesn’t need to feel cramped. It needs to feel intentional.