
There is a stubborn myth in the small-space community that you must paint everything stark white to make it feel open. I believed this for years until I lived in a 350-square-foot studio that felt more like a hospital waiting room than a home.
White walls reflect light, yes. But without depth, texture, or intentional zoning, a small white box just feels like… a small white box.
For spaces under 600 sq ft, the best special paint techniques are Color Blocking (to define zones without physical dividers), Vertical Ombre (to visually lift ceilings under 8ft), and Gloss Mapping (using sheen contrast to bounce light). These DIY solutions typically cost under $150 and add visual depth that flat paint lacks.
This guide isn’t about complex murals or dated sponge painting. We are looking at architectural painting, using brush and roller tricks to manipulate how the eye perceives volume, height, and function in tight quarters. Whether you are maximizing a tiny house loft or trying to carve out a home office in a studio apartment, these techniques offer a high return on investment.
Color Blocking: Creating “Virtual Walls”
When you don’t have the square footage for physical room dividers, paint becomes your architect. Color blocking involves painting distinct geometric shapes or sections to define specific functional areas.
Color blocking creates psychological separation in open-concept layouts. By painting a specific shape (arch, square, or corner wrap) behind furniture, you anchor the zone. For a desk nook, paint an arch 6 inches wider than the desk on both sides. Cost: <$50 (sample pots often suffice).
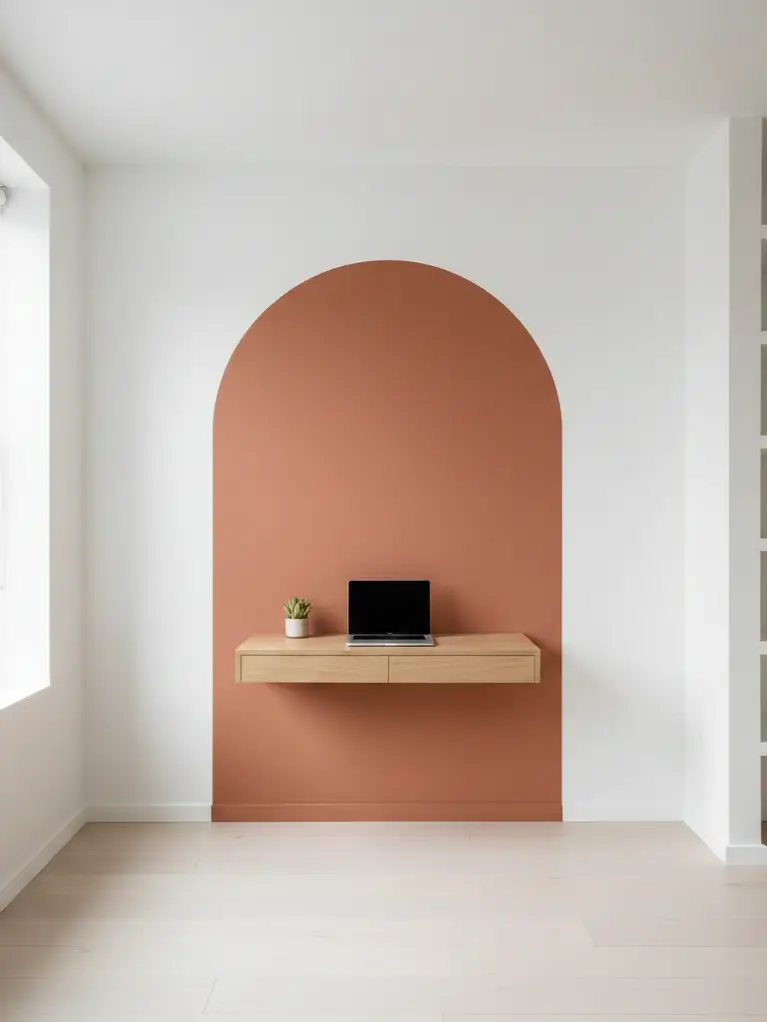
The “Zoning Arch” Technique
In a multi-purpose main room, your brain struggles to separate “work mode” from “rest mode” if the walls are uniform. A painted arch creates a visual container for your furniture.
I recently tested this in a client’s 450 sq ft apartment. We painted a Terracotta arch behind a floating desk.
- The Math: The desk was 40 inches wide. We marked the arch at 52 inches wide (6 inches overhang per side).
- The Height: We extended the arch up to 7 feet on an 8-foot wall.
- The Result: The “office” felt like a separate room, yet we lost zero inches of floor space.
The “Corner Wrap” for Sleeping Nooks
If your bed is in the corner of a studio, paint that corner, both joining walls and potentially the ceiling, a deep, moody color. This creates a cozy “jewel box” effect. It separates the sleeping area from the living area more effectively than a curtain, which can cut off light.
Pro Tip: For clean lines, do not peel your painter’s tape while the paint is dry. Peel it while the paint is still slightly tacky, pulling at a 45-degree angle away from the wet edge.
- Read More: Tiny House Layout & Floor Plan Ideas
- Read More: Choosing Neutral Paint Colors for Small Apartments
Vertical Ombre: The Ceiling Lift
Low ceilings are the nemesis of tiny house lofts. Standard lofts often have clearance of just 3 to 4 feet. A flat wall color defines that top edge clearly, emphasizing the lack of height. An ombre (gradient) effect blurs that line.
Vertical Ombre fades from a dark color at the bottom to white (or your ceiling color) at the top. This eliminates the harsh horizon line where the wall meets the ceiling, tricking the eye into perceiving more vertical space. Best for: Lofts and basements with <7ft ceilings.
How to Execute in a Tight Space
Blending paint requires speed, which is actually easier in a small room because you have less wall width to cover.
- Measure: Divide your wall into three horizontal sections.
- Apply: Paint the bottom darker color, the top lightest color, and a mix of both in the middle strip.
- Blend: Use a clean, slightly damp brush to cross-hatch the boundaries while wet.
- The Small Space Modification: In a tiny house loft, start the fade lower. Keep the “dark” section to the bottom 24 inches. If the dark color goes too high, the room might feel like it’s closing in.
I recommend sticking to the same color family (e.g., Navy to Pale Blue to White) rather than mixing contrasting colors, which can look busy in spaces under 100 sq ft.
- Read More: Low Ceiling Paint Solutions
- Read More: Tiny House Bedroom Design
Limewash: Texture Without Bulk
In large homes, people add texture with wainscoting, shiplap, or thick wallpaper. In a tiny house on wheels, every pound matters. Wood cladding adds weight; wallpaper adds visual noise. Limewash paint adds depth through texture with zero weight penalty.
Limewash is a mineral-based paint that dries with a chalky, mottled finish. It adds organic movement and softness to walls, diffusing light rather than reflecting it harshly. It is naturally low-VOC and mold-resistant, making it ideal for Bathroom Paint Moisture Solutions.
Why It Works for Minimalists
Flat latex paint can feel plastic-like. Limewash feels like natural stone. For a minimalist aesthetic, this allows you to keep the walls neutral (beige, greige, stone) without them looking boring.
- Application: It is applied with a block brush in chaotic “X” strokes.
- Coverage: It covers less area than latex. Expect 250 sq ft per gallon compared to the standard 350-400 sq ft.
- Cost: It is an investment. A gallon of high-quality limewash can run $60-$100, whereas standard latex is $30-$50. However, for a tiny house bathroom or accent wall, you often only need a quart.
Warning: Limewash is porous. If you use it in a high-traffic narrow hallway or kitchen backsplash, you must apply a sealer, or it will absorb grease and water stains.
- Read More: Low VOC Paint for Tiny Houses
- Read More: Paint Products & Sealers
Gloss Mapping: The Light Bender
This is the most subtle technique, often used by high-end designers, but easily doable on a DIY budget. Instead of changing colors, you change the sheen.
Gloss Mapping involves using the exact same paint color in different finishes (e.g., Matte vs. Semi-Gloss) to reflect light in specific patterns. Painting a vertical stripe of semi-gloss on a matte wall creates a “ghost stripe” that only appears when light hits it, adding interest without visual clutter.
The Monochromatic Stripe
In a narrow hallway (common in apartments and shipping container homes), bold contrasting stripes can feel aggressive and make the hall feel like a tunnel.
Instead, try this:
- Paint the entire wall in Matte Navy.
- Tape off vertical stripes (6 inches wide).
- Paint the stripes in Semi-Gloss or High-Gloss Navy.
The result is a sophisticated texture that bounces light around the tight space. It draws the eye upward (vertical lines) but doesn’t scream for attention.
The Trim Illusion
Usually, we paint baseboards white and walls color. In a room with 8-foot ceilings or lower, this horizontal white line “chops” the wall, making it look shorter.
The Fix: Paint your baseboards, door frames, and doors the exact same color as the wall, but in a Satin or Semi-Gloss finish for durability. This seamless look removes visual breaks, making the wall appear taller.
- Read More: Narrow Space Paint Solutions
- Read More: Paint Finishes for Small Spaces
Which Technique Fits Your Space?
Not every technique works for every layout. Here is how to choose based on your specific spatial problem.
Use Color Blocking for studios needing defined rooms. Use Ombre for lofts with low clearance. Use Gloss Mapping for narrow hallways. Use Limewash for bathrooms or spaces needing organic warmth.
| Criteria | Color Blocking | Vertical Ombre | Limewash | Gloss Mapping |
| Primary Goal | Define Zones | Height Illusion | Texture/Depth | Light Reflection |
| Difficulty | Beginner (Tape) | Intermediate (Blending) | Intermediate (Brushwork) | Beginner (Tape) |
| Small Space Risk | Can look cluttered if shapes are too small | Can lower ceiling if dark color is too high | Can feel busy if color is too dark | Low risk (very subtle) |
| Cost (DIY) | $ (Sample pots) | $$ (2-3 Colors) | $$$ (Specialty paint) | $$ (2 Sheens) |
| Best Room | Home Office / Nook | Bedroom Loft | Bathroom / Living | Hallway / Entry |
The “Half-Painted” Wall
A hybrid of color blocking and wainscoting. Paint the bottom two-thirds of the wall a grounded color (like sage green) and the top third (and ceiling) white.
- The Trick: Do not stop at standard chair-rail height (32 inches). In a small room, bring the color line up to 60 or 70 inches.
- Why: High horizon lines make the ceiling feel further away. It creates a cozy “wrap” around you while seated, but leaves the upper volume airy.
- Read More: Brighten Dark Apartment Paint Strategies
- Read More: Paint Budget & Cost Analysis
Tools and Prep for Tight Quarters
Painting a 3000 sq ft house is hard because of the sheer volume. Painting a 300 sq ft house is hard because you have no room to move.
In tight spaces, forgo the standard 9-inch roller and extension pole. Use a 4-inch mini roller for better control in corners and behind toilets. Use short-handled angled sash brushes (2-inch) to cut in without hitting the opposing wall with the handle.
The “Furniture Tetris” Factor
You likely cannot empty the room. You have to move everything to the center.
- The Tape: Use high-quality multi-surface tape (like FrogTape) because in a small room, you are always viewed up close. Mistakes are more visible at a 2-foot viewing distance than a 10-foot distance.
- Ventilation: In tiny spaces, fumes build up instantly. Even if you love the color, if it isn’t Low-VOC or Zero-VOC, don’t use it. You will be sleeping inches away from those walls.
- Read More: Painting Tools for Tight Spaces
- Read More: Paint Preparation for Small Apartments
A Note on “The Box” Technique
The boldest move for a small room is “Color Drenching” (or The Box). This means painting the baseboards, walls, crown molding, and ceiling all the same color.
Color Drenching erases boundaries. When the eye cannot find the corner where the wall meets the ceiling, the room feels infinite rather than enclosed. This works beautifully in tiny bathrooms or powder rooms using dark, rich colors like charcoal or forest green.
I recently saw a 30 sq ft half-bath transformed with Deep Teal drenched on every surface. It didn’t look “small”; it looked “intentional.” It turned a cramped utility space into a boutique hotel experience.
- Read More: Tiny House Bathroom Design
- Read More: Tiny House Color Selection
Final Thoughts
Paint is the cheapest renovation tool available to the small-space dweller. It costs pennies per square foot compared to knocking down walls or buying new furniture.
When selecting a special paint technique for your Tiny House or Apartment, ask yourself: What is the problem I am trying to solve?
- Is the room too short? Ombre.
- Is it too undefined? Color Block.
- Is it too sterile? Limewash.
- Is it too dark? Gloss Map.
Start with one accent wall or one nook. In a small space, a little technique goes a very long way.
- Measure your intended zone (width and height).
- Buy two sample pots (one matte, one semi-gloss, or two colors).
- Test a 2×2 foot section on the wall and observe it for 24 hours in different light.

