
You might think spray painting is reserved for people with driveways, garages, or massive backyards. I used to think that too. The first time I tried to spray paint a thrifted nightstand in my 450-square-foot studio, I didn’t account for “overspray drift.” I ended up with a fine layer of navy blue dust on my toaster, which was in the kitchen, 15 feet away.
That disaster taught me a lot. The truth is, you can spray paint in small spaces, but the margin for error is razor-thin. It requires a completely different protocol than painting outdoors.
To spray paint in a small apartment or tiny house safely, you must prioritize water-based (low-VOC) spray paints over solvent-based ones. You need to construct a containment zone (a “spray booth”) using a large cardboard box or a pop-up tent, maintain a minimum 3-foot clearance from all walls, and ensure active ventilation using a cross-breeze or box fan pointing out a window.
If you are a renter or living in a tiny home, this guide is for you. We are moving away from the “garage mentality” and focusing on the “living room lab” approach. From spending $12 on a drop cloth to investing $60 in a proper respirator, we will cover how to get that factory finish without losing your security deposit or your air quality.
The Chemistry of Small Spaces
Which Spray Paint is Safe for Indoors? For indoor or semi-enclosed painting, strictly use water-based acrylic spray paints (like Pintyplus Aqua or Liquitex). These have significantly lower VOCs (Volatile Organic Compounds), low odor, and clean up with water. Avoid enamel or oil-based sprays indoors; they require heavy-duty ventilation that most small apartments cannot provide.
When you live in under 600 square feet, air quality isn’t just a buzzword; it’s immediate reality. Traditional spray paints rely on strong solvents to keep the paint liquid. When you spray, those solvents evaporate into your air. In a large house, they dissipate. In a tiny house, they concentrate.
Why Water-Based is the Only Choice:
- Odor Dissipation: Water-based sprays smell like rubbing alcohol for about 20 minutes, then the smell vanishes. Oil-based sprays can stink up a studio apartment for 3 days.
- Dry Time: Water-based formulas are often touch-dry in 15-20 minutes. This is crucial when you don’t have a dedicated drying room and need your living space back.
- Safety: While you still need a mask, the toxicity levels are drastically lower.
I recently tested a “low odor” solvent-based brand in my bathroom with the fan on. It wasn’t enough. My towels smelled like chemicals for a week. Stick to water-based options like Pintyplus or Montana GOLD (acrylic) for indoor peace of mind.
If you are concerned about chemicals, reviewing low-voc paint options for tiny houses is a smart first step before buying your cans.
Building Your Containment Zone
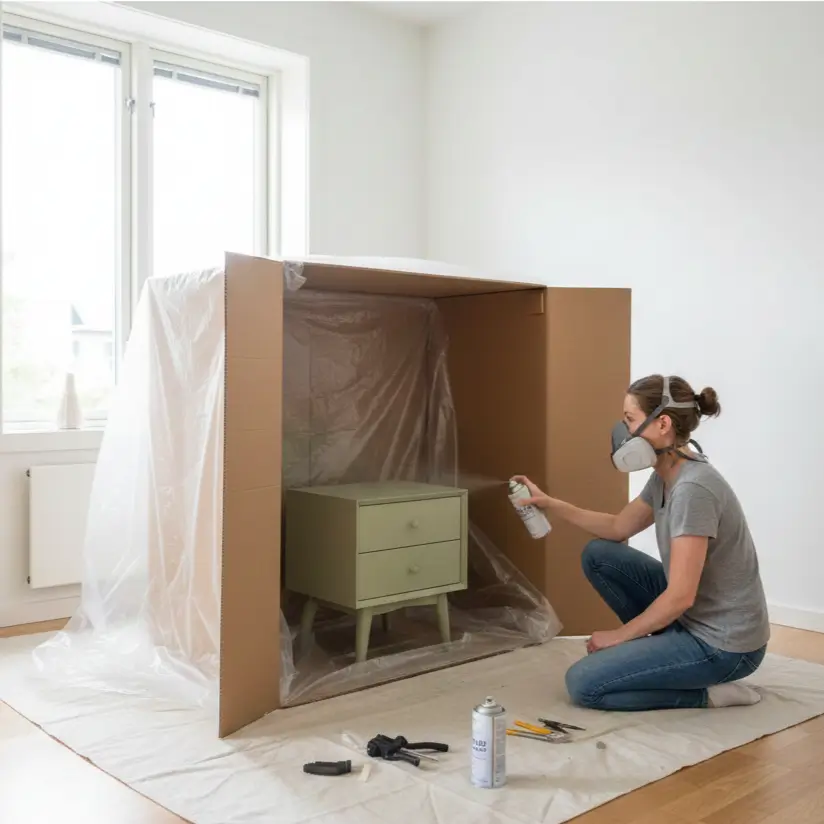
How to Make a DIY Spray Booth in 20 Sq Ft? Create a “capture zone” using a large wardrobe box (approx. 24″ x 24″ x 48″) with the top and front cut open. Line the interior with a cheap plastic drop cloth. Place the object inside on a turntable (lazy Susan). This structure catches 90% of overspray dust that would otherwise settle on your furniture and floors.
The biggest enemy in a small apartment isn’t the paint on the object; it’s the paint that misses. Overspray is dry paint dust that floats on air currents.
The Cardboard Fortress Strategy:
I use this method for small decor, lamps, and dining chairs.
- The Shell: Get the biggest cardboard box you can find. Appliance boxes are gold.
- The Turn: Place a cheap $10 lazy Susan inside the box. This allows you to spin the object without reaching your arm inside the “paint cloud.”
- The Floor: Lay a drop cloth that extends 3 feet beyond the opening of the box. Overspray falls downward eventually; you want it landing on plastic, not your rental’s laminate flooring.
- The Mask: Even with a booth, wear a respirator. A standard N95 helps with particles, but a respirator with organic vapor cartridges is safer.
If you are tackling something larger, like a dresser, and you have access to a small balcony or patio, you might want to look into painting tools for tight spaces, specifically pop-up spray shelters. These look like small camping tents without a front wall and cost around $40-$50. They fold down into a flat disc, making them perfect for tiny house storage.
How to Minimize Overspray Radius
To reduce airborne particles, hold the can closer than usual (6-8 inches) but move faster to prevent drips. Use short, controlled bursts rather than a continuous stream. Start the spray off the object, sweep across, and release the button off the object. This “start-stop” method creates less turbulent air and keeps more paint on the target.
In a large garage, you can stand back 12 inches and blast away. In a tiny home, that extra distance allows paint to dry in mid-air, creating a rough, sandy texture on your furniture (and dust on your walls).
The “Low-Volume” Approach:
- Distance: 6 to 8 inches from the surface.
- Speed: Move your hand at a steady pace of about 1 foot per second.
- Pattern: Overlap your spray passes by 50%.
- Temperature: Ensure your room is between 65°F and 85°F. If it’s too hot, paint dries too fast. Too cold, and it won’t cure.
If you are struggling with the mechanics of the can, you might actually get better control using different equipment. Read up on the differences in our spray vs brush vs roller guide to see if an electric handheld sprayer might actually offer you more control than a rattle can.
Common Mistake:
Don’t try to get full coverage on the first coat. It should look patchy. If you try to make it solid red on the first pass, you will get drips. Three thin coats are better than one thick coat, especially when ventilation is limited.
Do I Really Need Primer on Small Projects?
Yes, especially in small spaces where you cannot afford to sand off a failed paint job and start over. A high-quality bonding primer ensures adhesion, meaning fewer topcoats are needed. This saves money and reduces the total amount of aerosol spray released into your home.
Preparation is 70% of the work. If you are painting furniture or home decor, skipping the clean-and-sand step is a guarantee for peeling paint.
The “Apartment Prep” Checklist:
- Clean: Use a degreaser (like TSP substitute) to remove oils.
- Scuff Sand: You don’t need to strip it to bare wood. Just scuff the surface with 220-grit sandpaper so the paint has “teeth” to grab onto.
- Tack Cloth: Wipe away the sanding dust. Do not use a wet rag; water raises the grain on wood.
- Prime: Use a spray primer compatible with your topcoat.
Material Specifics:
- Plastic/Laminate: Requires a specialized plastic primer. See our guide on painting plastic, foam, and rubber.
- Metal: If you’re updating hardware or a metal lamp, ensure your primer inhibits rust. Check painting metal surfaces for specifics.
- Wood: Raw wood drinks paint. A primer seals it so your expensive colored spray doesn’t just soak in.
Managing Fumes During the Drying Phase
Create a drying station near your best ventilation source. Even water-based paints off-gas while curing. If possible, move the item to a bathroom with an exhaust fan or place it near a window with a box fan blowing outward. Leave the object untouched for at least 24 hours before handling, even if it feels dry.
Space is money in a tiny house. You can’t have a wet chair sitting in your hallway for three days.
The “Vertical Drying” Hack:
If you are painting multiple small items (cabinet doors, drawer fronts), use a vertical drying rack.
- Budget Solution: Use wire coat hangers to hang items from a tension rod in your shower (ensure the shower is dry and fan is on).
- Space Saver: Stackable “painter’s pyramids” ($6 for a pack of 10) lift your project off the table, allowing you to paint both sides and dry them on a smaller footprint.
Handling the Wait:
Paint dries from the outside in. It might feel dry in 20 minutes, but it is soft underneath. If you put a heavy lamp on that newly painted nightstand too soon, it will leave a permanent dent. For a deep dive on this timeline, look at our resource on paint preparation and drying.
Safety Note: Never sleep in the same room as a drying project if you can smell it. If you live in a studio, plan your painting for a day when you can leave the windows open for 4-6 hours minimum.
Project Ideas & Budget
What Does a Small Space Spray Setup Cost? A basic safe setup costs between $45 and $85. This includes a respirator ($30), drop cloths ($10), painter’s tape ($5), and sandpaper ($5). The paint itself ranges from $6 to $15 per can. This is significantly cheaper than buying new furniture but requires an upfront investment in safety gear that you will reuse.
Cost Breakdown Table:
| Item | Budget Option | Quality Option | Necessity |
| Respirator | N95 Mask ($2) | 3M Half-Face ($35) | High |
| Ventilation | Open Window ($0) | Box Fan ($20) | High |
| Protection | Garbage Bags ($0) | Canvas Drop Cloth ($15) | Medium |
| Containment | Cardboard Box ($0) | Pop-up Shelter ($45) | Medium |
| Paint (per can) | Hardware Store Brand ($6) | Artist Grade ($12) | High |
ROI Analysis:
I painted a metal filing cabinet for my home office.
- New cabinet cost: $140.
- Thrifted rusty cabinet: $15.
- Supplies (Sandpaper, Primer, 2 cans of paint): $28.
- Total Savings: $97.
Plus, I customized the color to match my tiny house color selection, which you rarely get with store-bought items.
Troubleshooting Common Issues
Why Does My Paint Look Dusty or Bumpy? “Orange peel” or dusty texture usually happens because you sprayed from too far away, or the room was too hot/dry, causing paint to dry before it hit the surface. It can also happen if you didn’t shake the can for the full minute. To fix it, wait for it to cure (48 hours), lightly sand with fine grit (400+), and spray a final wet coat closer to the object.
The “Sputter” Problem:
If the can spits chunks of paint, the nozzle is clogged. This happens often with water-based paints as they dry quickly.
- Fix: Turn the can upside down and spray for 3 seconds until clear gas comes out (this clears the dip tube). Wipe the nozzle with warm water.
- Prevention: Always clear the nozzle after every session.
The “Wrinkle” Disaster:
If the paint wrinkles like a prune, you likely recoated too soon or too late. Most cans have a specific window: “Recoat within 1 hour OR after 24 hours.” If you spray at hour 3, the bottom layer is curing and the top layer reacts, causing wrinkles. Check out paint problems and solutions for more rescue tips.
Final Thoughts
Spray painting in a 400-square-foot apartment isn’t about reckless abandon; it’s about surgical precision. By swapping high-fume solvents for water-based acrylics and building a simple cardboard containment zone, you can achieve professional finishes without compromising your health or your security deposit.
- Find a 5×5 foot area where you can set up your “booth.”
- Check your window situation. Do you need a box fan?
- Pick up a respirator and one can of water-based paint to test on a small object, like a picture frame.
Start small. Once you master the “cardboard booth” technique, an entire world of low-cost, high-style customization opens up for your tiny home.
For more ideas on how to style your newly painted pieces, browse our tiny house decorating basics.

