
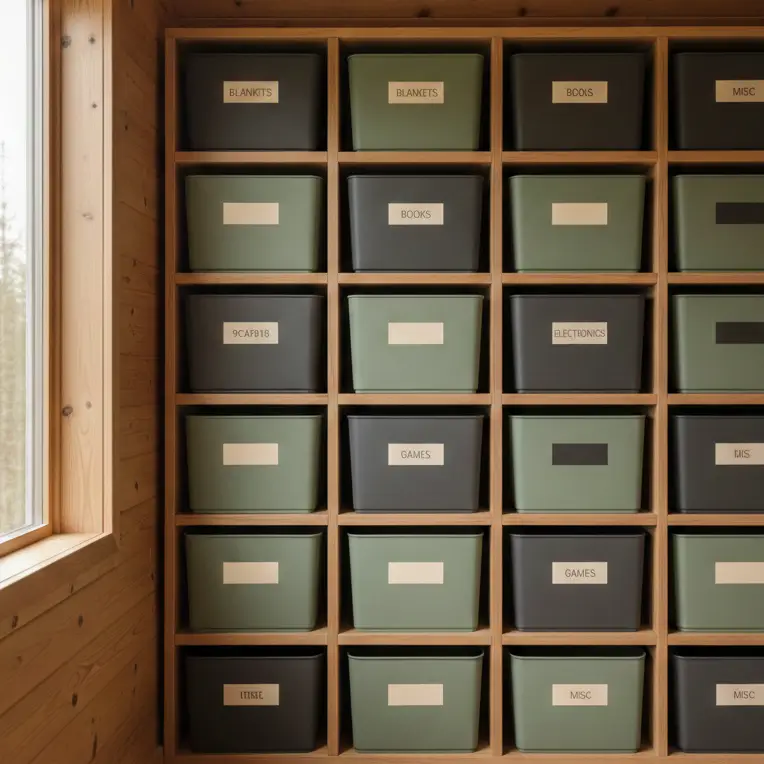
You have minimal square footage. You likely have maximum storage needs. This usually results in a stack of ugly, mismatched plastic bins, rubber floor mats, or exposed foam insulation ruining your carefully curated aesthetic.
Replacing all your plastic storage with wood or wicker is expensive, easily costing $500+. Painting those existing items costs about $40 in supplies.
But here is the catch: painting plastic, foam, and rubber is tricky. Plastic peels, foam melts if you look at it wrong, and rubber cracks the moment you bend it. Plus, if you live in a 400-square-foot tiny house, spraying chemicals indoors is a recipe for disaster.
I’ve ruined my share of projects by melting Styrofoam with the wrong primer. I’ve also successfully turned cheap dollar-store bins into “faux-metal” industrial storage that fits perfectly in my loft.
This guide covers exactly how to tackle these tricky materials without losing your security deposit or your brain cells to fumes.
The Safety Reality Check: Ventilation in <600 Sq Ft
Never spray paint in a closed tiny home. In spaces under 600 sq ft, VOC concentrations spike dangerously fast. Always paint outdoors. If you must paint indoors, use brush-on acrylics, open all windows, use a box fan for negative pressure, and wear a NIOSH-approved respirator (approx. $30).
When we talk about painting plastic, foam, and rubber, we are usually talking about chemical-heavy primers and sprays. In a standard house, you have a garage. In a tiny house or apartment, your living room is your bedroom and your kitchen.
The “Negative Pressure” Setup:
If you have a balcony, use it. If you don’t, you need a system.
- Isolate: Close the door to the rest of the apartment if possible (e.g., paint in the bathroom with the vent fan on).
- Push: Place a box fan in the window, facing out.
- Pull: Crack a window on the opposite side of the room to create airflow.
This is critical because many paints for these materials contain solvents like acetone or xylene. For more on keeping your air breathable, check our guide on paint safety regulations.
Painting Plastic: Turning Storage into Decor
Clean with soap and water, then wipe with isopropyl alcohol. Sand lightly with 180-220 grit sandpaper to create “tooth.” Use a plastic-specific primer (like Krylon Fusion or Rust-Oleum Plastic) or an adhesion promoter. Apply thin coats 15 minutes apart. Full cure takes 5-7 days.
Plastic is the most common material you’ll want to hide in a tiny home. We rely on clear bins for tiny house storage solutions, but visual clutter makes small spaces feel smaller. Uniform color reduces that visual noise.
The Prep Work (Don’t Skip This)
Plastic is non-porous. Paint has nothing to grab onto.
- Clean: Dish soap removes mold release agents (oils from the factory).
- Scuff: Hand-sand the surface. You aren’t trying to remove material, just take the shine off.
- Chemical Wipe: Wipe it down with rubbing alcohol or a tack cloth.
Choosing Your Paint
- Spray Paint: Easiest for smooth finishes. Look for “Bonds to Plastic” on the label.
- Brush-On: If you can’t spray, use a high-quality acrylic bonding primer first.
The Budget Impact
- New decorative bin: $25-$40 each.
- Plastic bin you own + paint: $0 bin + $8 paint (covers 3-4 bins).
- Total Savings: ~$90 for a set of three.
Pro Tip: If you are painting PVC pipes (common in open-shelf closet builds), standard plastic paint works, but you might want to read up on painting building materials for heavy-duty options.
Painting Foam: Avoiding the “Melt”
Never use solvent-based aerosols directly on Styrofoam or polystyrene; they will dissolve the foam instantly. Seal the foam first with a mixture of PVA glue and water (1:1 ratio), Mod Podge, or a specialized foam sealer. Once sealed and dry (24 hours), you can paint with acrylics or spray paint gently.
Foam is often present in tiny homes as exposed insulation or in DIY crafting projects for lightweight decor. The problem is chemistry. The propellants in spray paint eat foam faster than hot water melts sugar.
The Sealing Method
I learned this the hard way while trying to make a lightweight faux-brick wall for a rental studio.
- Seal It: Brush on three coats of Mod Podge or watered-down wood glue. Let each coat dry fully (about 45 minutes).
- Test It: Put a drop of your paint on a scrap piece. If it bubbles, seal it again.
- Paint It: Acrylic paint is safest. If you want the speed of spray paint, use water-based spray paint (like Montana Gold or Liquitex), though these are pricier ($12+ per can).
This is a great technique for upcycling packing foam into wall art or sound-dampening panels. If you are dealing with structural insulation, refer to our tiny house insulation guide before covering it up, as some paints can affect fire ratings.
Painting Rubber: The Flexibility Challenge
Rigid paints crack on rubber. You need an elastomeric coating. Plasti Dip (synthetic rubber coating) is the gold standard here. It sprays on liquid and dries into a flexible, rubberized skin. Alternatively, mix acrylic paint with a fabric medium or “flex additive” to allow the paint to stretch.
In a tiny house, you might have rubber floor mats, weatherstripping, or rubberized tool handles that need a refresh.
The Plasti Dip Solution
This stuff is magic for renters. It doesn’t permanently bond; it shrinks-wraps. If you hate the color later, you can peel it off like a sunburn.
- Surface: Rubber mats, tool handles, appliance seals.
- Prep: Clean vigorously with degreaser. Do NOT sand rubber (it shreds).
- Application: 4-5 heavy wet coats.
- Drying: 4 hours to touch, 24 hours to use.
Weatherstripping & Seals
If you are trying to freshen up the black rubber seals around your tiny house windows and doors, avoid painting them if possible. Paint creates a layer that can prevent the seal from compressing, causing leaks. Instead, use a rubber restorative conditioner.
The Apartment-Safe “Spray Booth” Setup
Create a capture box using a large cardboard wardrobe box (approx. 24″ x 24″ x 48″). Cut the top and front open. Line the back with a cheap HVAC filter taped over a hole. Place a box fan behind the filter pulling air out of the box and toward an open window.
If you are committed to painting plastic, foam, and rubber yourself, you need a rig. I’ve used this setup in a 500 sq ft apartment bathroom.
Materials Needed
- Large cardboard box (free from recycling bin).
- Box fan ($20).
- HVAC Filter ($5, MERV 8 is fine).
- Duct tape.
- Lazy Susan (turntable) for the object ($10).
Why This Matters for Small Spaces
Overspray dust travels. Without a booth, you will find a fine layer of paint dust on your kitchen counters and bedsheets 15 feet away. This booth captures 90% of the particles. For more on tools that fit in small closets, check our list of painting tools for tight spaces.
Spray vs. Brush for Difficult Materials
When you live small, you don’t have space to store 50 different paint cans. You need to choose the right method for the majority of your items.
| Feature | Spray Paint (Aerosol) | Brush-On (Acrylic/Enamel) | Small Space Verdict |
| Best For | Intricate shapes, plastic, rubber (Plasti Dip) | Foam, large flat surfaces, detail work | Brush is safer; Spray looks better. |
| Space Required | High (Ventilation + Overspray zone) | Low (Drop cloth on a table) | Brush wins for apartments. |
| Prep Time | High (Masking everything off) | Low (Just the object) | Brush is faster to start. |
| Durability | High (fusion technology) | Moderate (unless sealed) | Spray usually wins on plastic. |
| Cost | $6-$15 per can | $5-$10 per tube/jar | Brush goes further per dollar. |
If you decide to go the spray route, read our comparison on spray vs brush vs roller for tiny houses to see if buying a small electric sprayer is worth the investment (spoiler: only for empty houses).
Troubleshooting Common Disasters
Even with the best prep, things go wrong. Here is how to fix them without throwing the item in the trash.
“The Paint is Sticky/Tacky” (Blocking)
This happens on plastic and rubber when the plasticizers in the material react with the paint, or high humidity prevents curing.
- Fix: Dust it with talcum powder to reduce stickiness temporarily. If it persists after a week, strip it with isopropyl alcohol and start over with a better primer.
“The Foam is Eating Itself”
You sprayed too close or didn’t seal it well enough.
- Fix: Stop immediately. Let it dry and harden. Fill the “craters” with lightweight spackle or wood filler. Seal properly with PVA glue, then repaint.
“Fish Eye” (Spots where paint repels)
There was still oil or silicone on the plastic.
- Fix: Let it dry. Sand that spot gently. Clean with vinegar and water. Mist a very light coat over it (“dusting”).
For more on fixing screw-ups, see our guide to paint problems and solutions.
Final Thoughts: Upcycling is the Tiny House Way
Painting plastic, foam, and rubber isn’t just about changing a color; it’s about claiming ownership of your space. When you live in 400 square feet, every object is visible. A bright blue recycling bin or a mismatched rubber mat draws the eye and breaks the visual flow.
By spending a weekend and under $50, you can unify your visual palette, making your small space feel significantly larger and calmer.
- Go find the plastic item you want to paint. Scratch it. If your nail catches, it’s soft plastic (harder to paint). If it glides, it’s hard plastic (easier).
- Don’t skip this. Buy a specific adhesion promoter or plastic primer.
- Do not start this project if you can’t open a window.
Ready to tackle the rest of your home? Once your storage bins are drying, look at refreshing your furniture with our painting furniture home decor guide, or if you’re feeling brave, learn about painting metal surfaces for your appliances.
Check out more projects at Veniola.com.

