
If you live in a tiny house or a rental apartment, “renovation” is a scary word. It implies demolition, dust, and losing access to your already limited square footage. But here is a statistic that might change your mind: replacing a standard 10-foot run of laminate kitchen cabinets costs roughly $2,500. Painting those same cabinets? About $180 in materials.
When you are working with less than 600 square feet, every texture counts. The glossy, dated yellow laminate in your kitchenette or the rusted radiator in the corner isn’t just an eyesore; it dominates the room.
You don’t need a sledgehammer. You need the right chemistry.
In this guide, I’m going to walk you through painting specific surfaces that most people think are unpaintable: slippery laminate, cold ceramic tile, and slick metal. We will focus on low-fume, high-adhesion methods specifically designed for occupied small spaces where you can’t just move out for a week while the fumes clear.
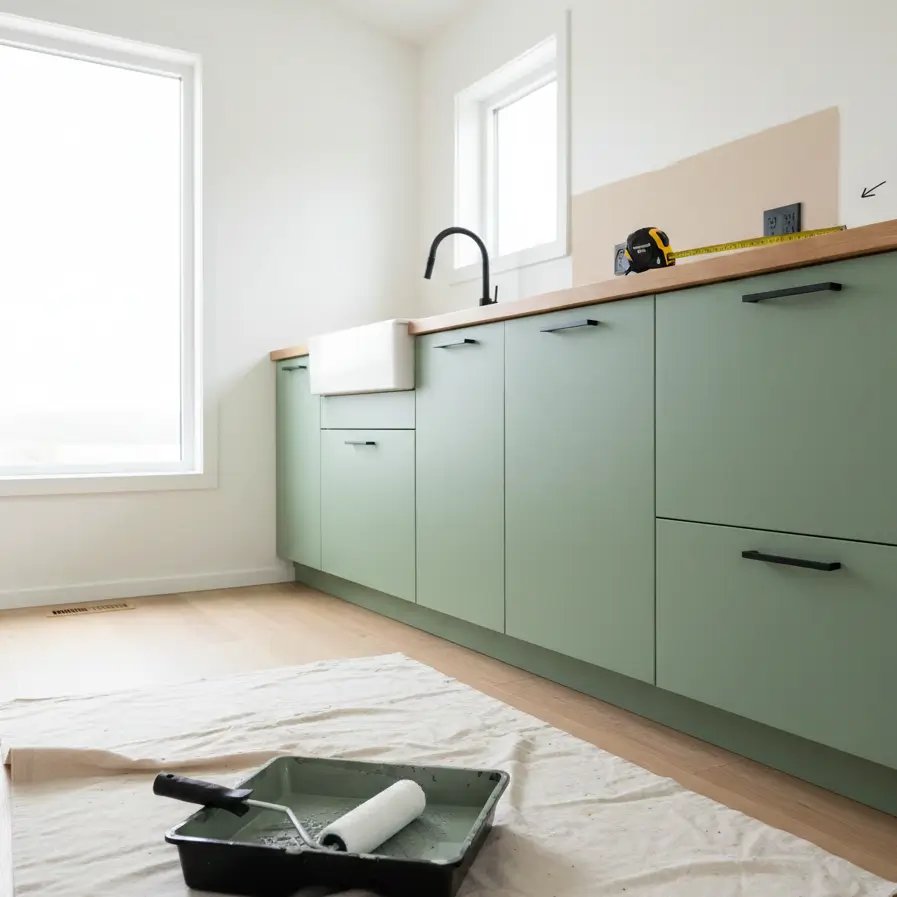
The “Impossible” Surface: Painting Laminate and Melamine
(Cabinets, IKEA Furniture, Countertops)
To paint laminate successfully in small spaces, you must de-gloss the surface with 120-grit sandpaper, clean with a TSP substitute, and use a high-adhesion bonding primer (like STIX or Zinsser BIN). Top with a urethane-alkyd enamel for a rock-hard finish that cures within 7 days. Never skip sanding.
Why Laminate is Tricky in Tiny Homes
Laminate and melamine (the stuff IKEA furniture is made of) are plastic finishes. Paint slides right off them. In a tiny house kitchen, your cabinets endure twice the wear and tear of a normal home because you are constantly brushing against them. If the paint peels, it looks trashy immediately.
The Small-Space Process
I recently helped a friend update her 280 sq ft studio kitchen. We didn’t have space to set up a spray booth, so we used the roll-and-tip method.
- The Scuff Sand: You aren’t trying to strip the surface; you just want to create “tooth.” Use 120-grit sandpaper. If you skip this, your paint will peel in sheets.
- The Primer is Everything: Standard drywall primer will fail. You need a bonding primer.
- Pro Tip: For tiny house kitchen design, use a water-based bonding primer (like INSL-X STIX) rather than shellac-based ones. Shellac works great but smells terrible, dangerous in a small, unventilated space.
- The Paint: Use a “Cabinet and Trim” enamel. These dry harder than wall paint, resisting the inevitable hip-checks and scratches in tight quarters.
Budget Reality:
- Replace: $2,000+
- Paint: $60 (Quart of Primer) + $80 (Gallon of Enamel) + $40 (Supplies) = $180
If you are looking to update furniture rather than built-ins, check out our guide on painting furniture and home decor for specific wax finishes.
The Cold Surface: Painting Tile and Glass
(Backsplashes, Bathroom Surrounds, Floors)
Painting tile requires a two-part epoxy or a specialized tile paint system. Clean thoroughly to remove soap scum, sand with 220-grit paper, and apply a high-adhesion primer. For floors, use a stencil pattern to hide imperfections. Allow 3-5 days of dry time before light use to prevent lifting.
The Moisture Challenge
In a tiny house bathroom, humidity is concentrated. Ordinary latex paint on tile will bubble and peel within weeks due to the moisture load.
Choosing Your Product
You have two main paths here:
- Tub & Tile Refinishing Kits (Epoxy): These are incredibly durable but the fumes are intense. If you use this in a tiny house, you must have all windows open and ideally sleep elsewhere for 24 hours.
- Bonding Primer + Enamel: This is the safer route for occupied small apartments. It’s less durable than epoxy but easier to touch up.
Step-by-Step for a 20 sq ft Backsplash
- Deep Clean: Scrub with an abrasive cleaner to remove all grease. If you’re painting a kitchen backsplash, grease is your enemy.
- Detail Work: Use a small artist’s brush for the grout lines first.
- Top Coat: Apply two coats of semi-gloss or high-gloss enamel. Satin or flat finishes hold onto dirt and are harder to wipe down in a tight cooking space.
For more on managing humidity in these zones, read about bathroom paint moisture solutions.
The Slick Surface: Painting Metal and Hardware
(Radiators, Window Frames, Cabinet Handles, Appliances)
Clean metal surfaces with a degreaser and remove loose rust with a wire brush. Use a metal-specific primer (rust-inhibitive) followed by an oil-based enamel or DTM (Direct-to-Metal) acrylic. For heating elements like radiators, ensure the paint is heat-rated (usually up to 250°F).
Spray vs. Brush in Small Spaces
Normally, people suggest spray painting metal for a smooth finish. Do not do this inside a small apartment. The overspray settles on everything, your bed, your dishes, your cat.
Instead, look for spray vs. brush vs. roller insights specifically for interiors. My recommendation? Remove the hardware (handles, knobs) and take them outside. If you must paint a radiator or window frame in place, use a high-quality 1.5-inch angled sash brush and self-leveling oil-based paint.
The Rust Factor
If you are converting a van or rehabbing an older container home, rust is common. You cannot paint over active rust; it will bleed through.
- Scrub with a wire brush.
- Apply a rust converter (turns rust into a paintable black surface).
- Paint with DTM (Direct to Metal) paint.
This is a critical part of painting metal surfaces correctly to ensure longevity.
Painting Plastics and PVC
(Window Frames, Plastic storage, Vinyl Siding)
Many tiny homes use vinyl windows to save weight. Over time, these yellow. Painting them is possible, but there is a catch: Color choice matters.
If you paint white vinyl black, the dark color absorbs heat from the sun and can warp the plastic frames, breaking the seal. Always choose a paint color with a Light Reflective Value (LRV) of 55 or higher, or buy “vinyl-safe” paint formulations specifically designed to reflect heat.
Check our guide on painting plastic, foam, and rubber for the specific chemical compatibility of different plastics.
The Right Primer for the Right Surface
In a space under 800 sq ft, buying three different gallons of primer is a waste of money and storage space. Here is how to choose one multipurpose workhorse.
| Surface Type | Water-Based Bonding Primer (e.g., STIX) | Shellac-Based Primer (e.g., BIN) | Oil-Based Primer (e.g., Cover Stain) | Small Space Verdict |
| Laminate | Good Adhesion / Low Smell | Best Adhesion / High Smell | Good Adhesion / High Smell | Water-Based is best for occupied units. |
| Raw Wood | Raises Grain | Seals Knots Perfectly | Seals Tannins Well | Shellac (buy a quart, not a gallon). |
| Metal | Acceptable (if non-ferrous) | Not Recommended | Best for preventing rust | Oil-Based (use spot priming). |
| Ceramic Tile | Good Adhesion | Excellent Adhesion | Good Adhesion | Water-Based bonding primer. |
For a deeper dive into preparation, see our guide on primer applications.
5 Critical Success Factors for Small Spaces
1. Ventilation is Non-Negotiable
In a 2000 sq ft house, fumes disperse. In a 300 sq ft tiny house, they concentrate.
- Action: Position a box fan in the window blowing out, and open a window on the opposite side to create cross-ventilation.
- Product: Prioritize low-VOC paint options whenever possible, especially for large surface areas like cabinets.
2. The “Cure Time” Trap
Paint dries to the touch in hours, but it “cures” (reaches full hardness) in 20-30 days. In a small space, you are likely bumping into that painted door frame constantly.
- Tip: Treat the surface like wet glass for the first week. If you bump it, it will dent.
3. Space Management During Painting
Where do you put the cabinet doors while they dry if you don’t have a garage?
- The Vertical Rack: I use “painters pyramids” stacked on a portable clothing rack or temporary shelving.
- Batching: Paint 4 doors at a time, not all 12. It takes longer, but you can actually live in your house during the process.
4. Tools for Tight Corners
Standard rollers are too big for tiny house nooks.
- The 4-inch Mini Roller: This is your best friend. It fits inside cabinets, behind toilets, and maneuvers around built-in storage.
- Read more about painting tools for tight spaces.
5. Cleaning Prep
Grease is airborne in small apartments because the stove is usually 5 feet from the living area. Even the walls near your sofa likely have a thin film of cooking oil.
- Rule: Wash everything with TSP substitute before painting. If you skip this, your paint will fish-eye (separate into craters). See paint preparation essentials.
Troubleshooting Common Issues
Brush marks on my laminate cabinets.
- Cause: Painting too slowly or using a cheap brush.
- Fix: Add a paint conditioner (like Floetrol) to your water-based enamel. It extends the drying time, allowing the paint to self-level.
Paint peeling off the radiator.
- Cause: Using standard wall paint on a hot surface.
- Fix: Scrape it off and use high-heat enamel.
The tile paint feels sticky weeks later.
- Cause: High humidity prevented curing, or you used an acrylic paint over a glossy surface without primer.
- Fix: You may need to strip it. Prevention is key: dehumidifiers are essential during the drying phase in tiny house heating and cooling contexts.
Final Thoughts: The ROI of Paint
When you live small, surfaces are closer to your eyes and your hands. You notice the chips, the stains, and the dated colors more than you would in a sprawling mansion.
Painting specific surfaces like laminate, tile, and metal allows you to reclaim the aesthetic of your home without the waste of ripping out functional fixtures. It is the ultimate act of tiny house sustainability, using what you have, improving it, and making it last.
- Buy a sample pot of bonding primer and test it on the inside of one cabinet door.
- Calculate your square footage using our paint coverage calculation tool to ensure you don’t overbuy expensive enamels.
- check your window setup before you open that can.
You don’t need a contractor. You just need patience, the right primer, and a free weekend.

