
I once watched a friend try to paint the laminate kitchenette in her 350-square-foot studio using standard wall paint. It looked fresh for about three days. Then, the first time she bumped it with a grocery bag, a long strip of “Antique White” peeled off like a sunburn.
Painting building materials, specifically non-porous surfaces like laminate, metal, and plastic, is entirely different from rolling latex onto drywall. In a tiny home or small apartment, this is high stakes. You don’t have a guest room to store drying doors for a week, and you certainly don’t have the air volume to dissipate harsh chemical fumes.
To successfully paint slippery building materials in small spaces, you must use a bonding primer (like a shellac-based or high-bond acrylic) followed by a urethane-alkyd enamel. Standard latex will peel. You also need to manage air quality aggressively, as fumes concentrate 5x faster in spaces under 600 sq ft.
Whether you are updating a vintage RV, refreshing a rental kitchen (with permission), or building a DIY tiny house, painting your existing materials is usually the most budget-friendly option. A full cabinet replacement might cost $2,000+, while a high-end paint transformation costs roughly $200-$300.
But you have to do it right. In this guide, I’m walking you through how to bond paint to the tricky materials that make up your compact life.
The “Small Air” Challenge: VOCs and Safety
In a 400 sq ft home, paint fumes (VOCs) reach toxic levels within 15 minutes of application if not ventilated. Always choose Low-VOC (<50g/L) or Zero-VOC products for interiors. Use a box fan in a window pushing air out to create negative pressure.
When we talk about painting building materials, we usually talk about adhesion. But in a tiny house, safety comes first. I realized this while painting a bathroom vanity in a 160 sq ft tiny house on wheels. I was using an oil-based primer. Within ten minutes, I was dizzy.
The math is simple but scary. A standard gallon of oil-based paint can off-gas significant volatile organic compounds. In a 2,500 sq ft suburban home, that disperses. In a tiny home with roughly 3,000 cubic feet of air volume, you are essentially living inside the paint can.
The Small Space Safety Protocol
- The “Out” Fan: Don’t just open a window. Place a box fan in one window facing outward. Open a window on the opposite side of the home about 3 inches. This pulls fresh air across the workspace and ejects fumes immediately.
- Respirators are Mandatory: For sanding and priming tight spaces, a $30 half-face respirator with organic vapor cartridges is better than a paper mask.
- Timing Matters: If you live in your small space, paint early in the morning so the initial cure happens while windows are open all day.
If you are particularly sensitive, look into low VOC paint for tiny houses specifically designed to minimize this risk.
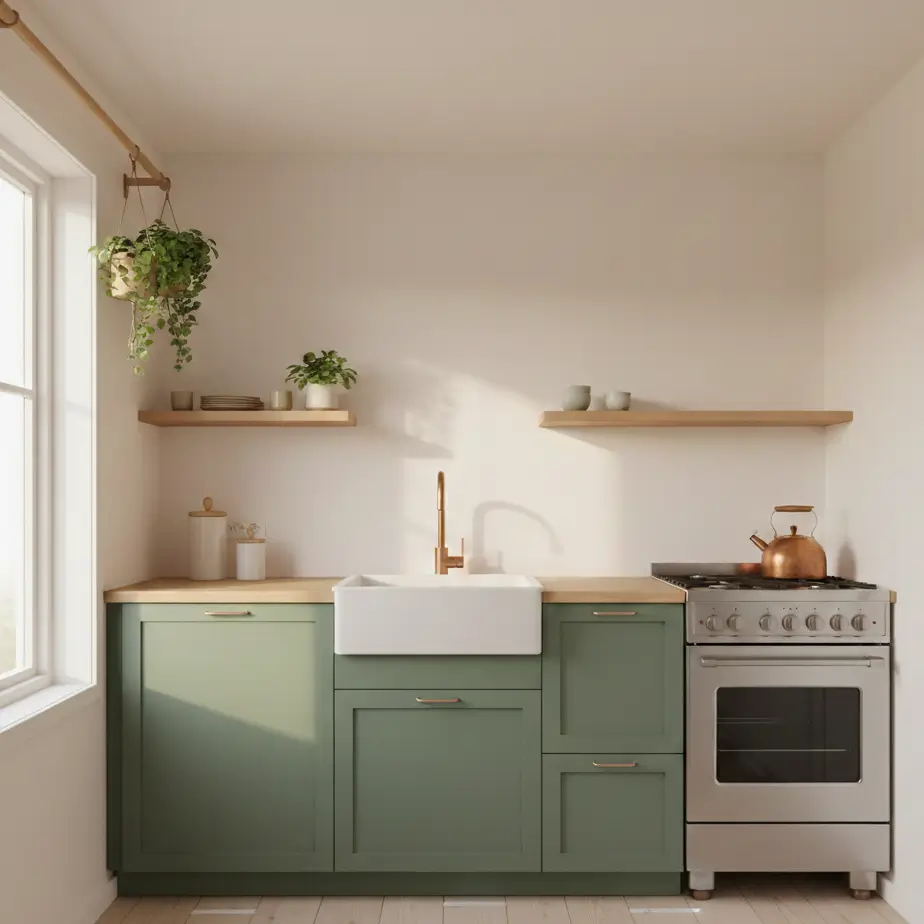
Painting Laminate and Melamine (The “Plastic” Woods)
Laminate and melamine (common in IKEA furniture and RV cabinets) are plastic surfaces. They do not absorb paint. You must “scuff sand” with 120-grit sandpaper to create tooth, wipe with a deglosser, and use a specialized bonding primer before applying topcoat.
Most tiny homes and apartments are full of laminate. It’s durable and cheap, but ugly. Renovating these surfaces allows you to change the entire feel of your home without the waste of ripping out functional cabinetry.
The Process for 500 Sq Ft Living
In a small apartment, you probably don’t have a garage to spray paint doors. Here is the “In-Place” method I use:
- Clean Like You Mean It: Kitchens in small spaces accumulate grease faster because the stove is rarely more than 5 feet from everything else. Scrub surfaces with TSP (Trisodium Phosphate) or a TSP substitute. If you skip this, the paint will float on top of the grease layer.
- Scuff Sanding: You aren’t trying to remove the laminate. You just want to make it look cloudy. Use 120-grit sandpaper.
- Tip: In a tight space, use a sanding sponge. It captures less dust than loose paper and wraps around corners easily.
- The Bridge (Primer): This is the most critical step. You need a primer that sticks to plastic.
- Budget Option ($20/qt): Zinsser Bulls Eye 1-2-3 (Water-based, decent smell).
- Pro Option ($55/gal): STIX Waterborne Bonding Primer (Incredible adhesion, low odor).
- Avoid: Standard drywall primer. It will scratch off with a fingernail.
Once primed, you can move on to your color. For cabinets, I highly recommend looking into painting furniture and home decor techniques to get that factory finish with a foam roller.
Painting Metal: Siding, Hardware, and Trim
Painting metal requires removing rust and oxidation first. Use a wire brush or steel wool. For ferrous metals (magnetic), use a rust-inhibitive primer. For non-ferrous metals (aluminum/copper), use a self-etching primer. Spray paint provides the smoothest finish for small hardware.
Tiny homes often feature exposed metal, conduit pipes, corrugated accents, or aluminum window frames. Painting building materials like metal is a great way to modernize a space, turning industrial silver into matte black or warm brass.
The Spray vs. Brush Debate in Tiny Spaces
If you are updating cabinet handles or a metal light fixture, take them outside. Spray painting inside a tiny house is a disaster waiting to happen. The overspray will land on your sofa, your bed, and your cat, because everything is within a 10-foot radius.
For fixed metal elements (like window frames or exposed beams):
- Masking is Key: Tape off the surrounding area aggressively.
- Use a Direct-to-Metal (DTM) Paint: Brands like Sherwin Williams and Benjamin Moore make DTM acrylics that brush on smoothly and stop rust.
- Application: Use a small, high-quality angled sash brush (1.5 inch). Metal shows brush strokes easily, so maintain a “wet edge.”
For a deeper dive on this specific material, check out our guide on painting metal surfaces. It covers rust management in detail.
Painting Tile and Fiberglass (The Bathroom Refresh)
Yes, you can paint ugly rental tile or a yellowed RV shower surround. Use a two-part epoxy kit for tubs/showers (high fumes, requires strict ventilation) or a high-adhesion tile paint for backsplashes. Clean with an abrasive cleaner to remove soap scum first.
Small bathrooms are tricky. Moisture is high, and ventilation is often poor. If you paint a tile backsplash in a tiny house bathroom, you need a product that creates a waterproof barrier.
The Epoxy Reality Check
I tested a “Tub & Tile” epoxy kit in a 24 sq ft bathroom. The result looked brand new, like glazed porcelain. However, the fumes were intense.
- Pros: Saves $3,000+ on demolition; looks like real ceramic; waterproof.
- Cons: difficult application (sticky); 3-day cure time where you cannot use the shower.
If you are just painting a kitchen backsplash that doesn’t get soaked, standard high-quality semi-gloss paint with a bonding primer works fine. But for wet zones, you need specific bathroom paint moisture solutions.
Choosing Your Finish: Durability vs. Aesthetics
In small spaces, walls and surfaces get touched constantly. Flat/Matte paint hides imperfections but scuffs easily. Eggshell is the minimum durability for walls. Satin or Semi-Gloss is mandatory for cabinets, trim, and doors to withstand friction and cleaning.
When painting building materials in a compact footprint, think about “Scrubbability.” In a hallway that is only 30 inches wide, your shoulders (or your dog) will brush the wall daily.
| Finish | Durability | Best For | Small Space Note |
| Flat/Matte | Low | Ceilings | Hides uneven drywall, but hard to clean. |
| Eggshell | Medium | Living/Sleeping Walls | The standard compromise. Wipes clean gently. |
| Satin | High | Kitchen/Bath Walls | Great moisture resistance. Reflects light to open space. |
| Semi-Gloss | Very High | Cabinets/Trim/Doors | Essential for laminate/wood materials. Shows imperfections. |
| High Gloss | Extreme | Accents | Highlights every scratch. Use sparingly. |
For a specific breakdown on brands that handle this well, read up on paint brands for small spaces.
The Economics: Paint vs. Replace
Painting is 10-15% of the cost of replacement. A 10×10 kitchen cabinet repaint costs ~$250 in materials (primer, paint, supplies). Replacing those cabinets costs $2,000 (IKEA) to $8,000 (Custom). Painting offers the highest ROI for DIY tiny house renovations.
Let’s look at the numbers for a typical project: Refinishing a 60 sq ft Tiny House Kitchen.
Option A: Replacement
- New Cabinets: $1,200
- New Countertop: $400
- Labor/Install: DIY (0$) or Pro ($800)
- Total: $1,600+
Option B: Painting Building Materials
- TSP Cleaner & Sandpaper: $25
- Bonding Primer (1 Gallon): $55
- Cabinet Enamel (1 Gallon): $70
- Supplies (Rollers/Tape): $40
- Total: $190
That $1,400 savings can go toward high-efficiency appliances or tiny house insulation upgrades.
However, be realistic. If the particle board underneath your laminate is swollen from water damage, paint won’t fix it. In that case, check out wood materials for tiny houses for replacement options.
Special Techniques for Texture and Depth
If you are dealing with very flat, boring materials (like flat-panel hollow core doors), paint can add dimension.
Faux Finishes
You can use glazing techniques to make painted laminate look like wood grain, though this requires artistic skill. A easier method for small spaces is “Color Blocking.” Because you don’t have large walls for art, painting a geometric shape on a door or cabinet adds visual interest without clutter.
Limewash and Mineral Paints
These create a beautiful, mottled texture that feels organic. They adhere best to porous surfaces (drywall, raw wood/brick). If you want this look on a sealed surface, you must use a mineral primer first. This is popular in the tiny house style aesthetic known as “Wabi-Sabi.”
Final Thoughts: Preparation is Everything
When painting building materials in a small home, 80% of the work is cleaning and sanding. The actual painting is the victory lap.
In a small space, imperfections are magnified. You are never more than a few feet away from your walls. A drip on a cabinet door will mock you every time you make coffee. Take your time. Apply thin coats. Let them cure fully according to the can’s instructions (usually longer in humid, small spaces).
- If your structure was built before 1978, swab the paint before sanding.
- FrogTape or sharp-line tape prevents bleed-through better than generic tan tape.
- Figure out your airflow strategy before you open the can.
Painting is the single most transformative tool in your DIY arsenal. It protects your home’s materials and reclaims the space as your own. For more on maintaining your updated surfaces, explore paint preparation for small apartments.
Ready to dig deeper into your build? Visit us at veniola.com for more guides.

