There is a fine line between a cozy, nature-inspired tiny home and a space that feels like a dark, claustrophobic cigar box. When I first started designing for spaces under 600 square feet, I made the mistake of thinking “wood is wood.” I used heavy, dark reclaimed barn wood in a 150-square-foot loft. The result? The ceiling felt like it was shrinking, and the trailer weight skyrocketed.
Wood is the most versatile material for small living, but it requires a strategic approach. It’s not just about aesthetics; it’s about grain direction, light reflectivity, and physical weight. Whether you are outfitting a rental apartment or building a THOW (Tiny House on Wheels), wood interior elements can anchor your design, if you choose the right species and placement.
From a $50 DIY plywood shelf to a $1,200 custom slat wall, here is how to use wood to make your small space feel larger.
Why Wood Works (and Fails) in Tiny Spaces
Wood interior elements introduce biophilic warmth, reducing stress in confined areas. However, in spaces under 400 sq ft, avoid high-contrast grains and dark species (like Walnut or Mahogany) on large surfaces. Opt for tight-grain, light woods like Birch, Maple, or Ash to reflect light and visually expand the room.
The Psychology of Grain
In a standard 2,000-square-foot home, you barely notice grain direction. In a tiny house, it dominates your field of vision. Horizontal grain (like shiplap) widens a narrow room, while vertical grain draws the eye upward, combating the low-ceiling feel common in lofts.
I recommend the 60/30/10 rule for wood tones in small spaces:
- 60% Light wood (Floors or walls – e.g., White Oak)
- 30% Painted surfaces (White or off-white)
- 10% Darker wood accents (Shelves or trim)
If you use too much wood, you risk the “sauna effect.” Balance is key.
When selecting materials, also consider the connection to nature. This concept, known as biophilia, is crucial when you don’t have a sprawling backyard. Integrating natural textures helps blur the lines between indoors and out.
See more on this connection in our guide to biophilic design in tiny homes.
The Vertical Slat Wall: A Multi-Functional Hero
A vertical wood slat wall adds height perception to low ceilings (common in lofts). For a DIY budget (~$150), use 1″x2″ pine or birch plywood strips spaced 0.5″ to 1″ apart. In small spaces, this isn’t just decor; the gaps function as a modular rail system for hooks, shelves, and hanging plants.
Why It’s Perfect for Renters and Owners
I recently helped a friend install a slat wall in her 450 sq ft studio. We didn’t just glue boards to the wall; we created a functional utility system. By ensuring the gaps between the slats were exactly 0.75 inches, we could insert custom pegs to hang coats, keys, and even a fold-down desk.
The Space Math:
- Depth Added: Only 1.5 inches (standard 1×2 lumber thickness).
- Visual Impact: Creates a focal point that draws the eye up, making 8-foot ceilings feel like 9-foot ceilings.
- Cost: Approximately $2.00 per square foot for DIY pine, versus $15+ for pre-made acoustic panels.
If you are renting, you can build this on a separate plywood backing and mount it like a large picture frame, causing minimal wall damage.
For more on temporary solutions, check our tiny house renters guide.
Selecting the Right Species: Weight vs. Durability
For Tiny Houses on Wheels (THOWs), weight is critical. Avoid heavy hardwoods like Oak (45 lbs/ft³) for walls. Instead, use lightweight Cedar (23 lbs/ft³) or Pine (28 lbs/ft³). For high-traffic areas like floors or countertops in stationary apartments, stick to harder woods like Maple or Ash to resist dents.
The Weight Equation for Mobile Living
If you are building on a trailer, every pound counts toward your Gross Vehicle Weight Rating (GVWR). Cladding your entire interior in ¾-inch solid oak tongue-and-groove could add over 1,500 lbs to your build.
Lightweight Alternatives:
- Birch Plywood (¼ inch): incredibly strong, lightweight, and modern. It creates a seamless “Scandi” look.
- Paulownia: Known as the “aluminum of timber,” it is rot-resistant and incredibly light, though harder to source in the US.
- Thin Veneers: Apply wood veneer over lightweight substrates to get the look of walnut without the weight penalty.
Deep dive into materials: Wood materials for tiny houses.
Wood in Specific Zones: Kitchen & Bath
Wood in wet zones requires sealing. For tiny kitchens, butcher block is a budget-friendly countertop ($200-$400) but requires monthly oiling. Use “Waterlox” or marine-grade varnish for bathrooms. In tight layouts (kitchens <8 ft long), use lighter wood tones to prevent the cabinetry from feeling heavy or imposing.
The Butcher Block Debate
In a standard house, stone is king. In a tiny house, stone is heavy and can crack during transit. Wood countertops are lighter and warmer to the touch.
However, standard counter depth is 25 inches. In a tiny house or narrow apartment kitchen, you might only have 20-22 inches of depth. Buying standard butcher block and ripping it down is a great way to save money and get a custom fit. Use the off-cut strip as a matching backsplash or a narrow shelf.
- Sealant Tip: For food prep areas, pure Tung Oil is food safe and water-resistant, though it takes time to cure. For a maintenance-free finish, look into matte polyurethane, but be aware it can scratch.
Explore more on layouts here: Tiny house kitchen design.
DIY Plywood Features: The Budget Maximizer
Baltic Birch plywood is the gold standard for modern small-space cabinetry and built-ins. Unlike solid wood, it is dimensionally stable (won’t warp with humidity changes). A 4’x8′ sheet costs $80-$120 and can yield a desk, two floating shelves, and a small cabinet face.
Exposed Edges as a Design Feature
In traditional carpentry, you hide the plywood edges. In modern small-space design, exposing the striped ply edge is a stylistic choice. It adds texture and honesty to the materials.
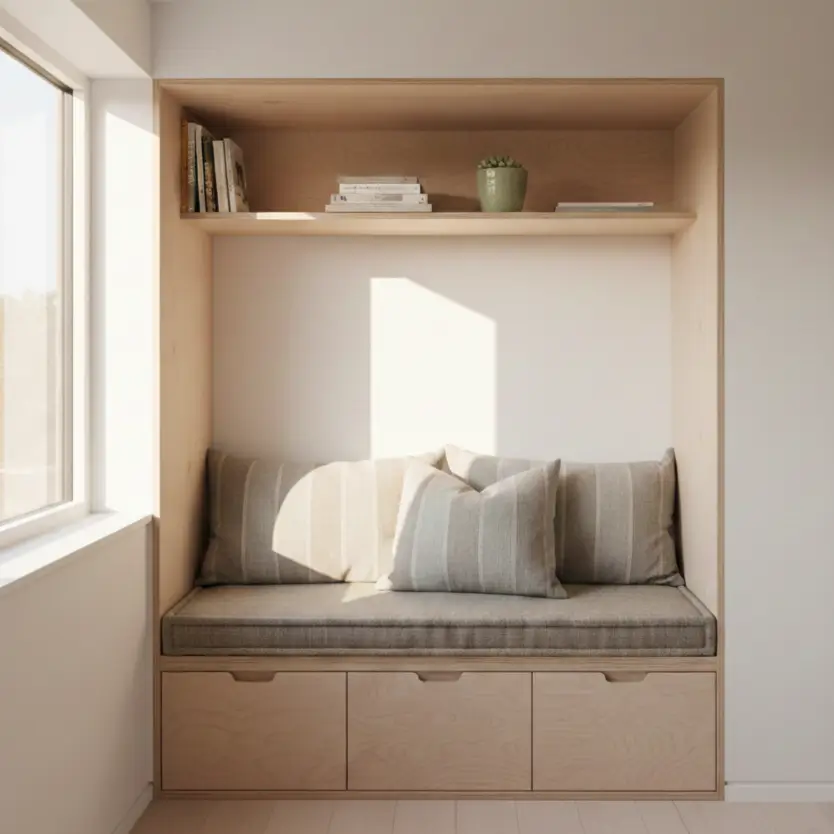
Project Idea: The Nook Liner
If you have a window recess or an alcove, line the interior with ¼-inch plywood. It frames the view like a living painting and creates a distinct “zone” without building walls. This technique is fantastic for defining a sleeping area in a studio apartment.
See how this applies to sleeping zones: Tiny house bedroom design.
Mixing Wood Tones: The Rules for Small Spaces
Limit yourself to two wood tones max in spaces under 600 sq ft. A dominant tone (flooring/walls) and an accent tone (furniture/trim). Ensure they share the same undertone (warm/yellow vs. cool/gray). Mixing too many grains creates visual clutter, making the room feel messy even when it’s clean.
The Undertone Test
Hold a piece of white printer paper next to your wood sample.
- Does it look orange/yellow? It’s warm (Oak, Pine, Fir).
- Does it look pinkish/gray? It’s cool (Ash, Whitewashed styles).
Don’t mix pink undertones with yellow undertones. It will always look “off.”
If your rental apartment has generic “orange oak” cabinets that you can’t change, don’t fight it with dark walnut furniture. Lean into it with warm neutrals or go high-contrast with matte black hardware to modernize it.
For more on color theory: Tiny house color selection.
Caring for Wood in Tight Quarters
In small spaces, you interact with your surfaces constantly. You brush against the wall, you drop keys on the same spot on the counter, and humidity from a shower can travel to the living room in seconds.
- Humidity Control: Wood expands and contracts. In a tiny house, moisture from cooking and breathing accumulates fast. Install a high-quality exhaust fan to prevent warping.
- Related: Tiny house heating and cooling.
- Scratch Repair: Keep a “Tibetan Almond Stick” or a matching stain marker in your junk drawer. In a small space, imperfections are highly visible.
- Plant Protection: If you have plants on wood shelves, use cork coasters. Water rings are the enemy.
- Related: Indoor plants small apartments.
Final Thoughts
Using wood interior elements in a small space isn’t about recreating a log cabin; it’s about introducing texture. In a room where you can touch almost every wall from the center, the tactile quality of your materials matters more than in a mansion.
Whether you choose a sleek birch plywood ceiling or a rustic cedar accent wall, remember that vertical lines add height, light colors add breathability, and proper sealing ensures longevity.
- If your space is dark, commit to light woods like Maple or Birch.
- Get a cheap hygrometer. If your tiny home stays above 60% humidity, invest in a dehumidifier before installing expensive wood.
- Try a DIY wooden slat detail behind your TV or bed before cladding a whole room.
By being intentional with your wood choices, you can turn a cramped box into a warm, inviting sanctuary.
Ready to tackle your next project? DIY tiny house building projects.