
Hydro dipping, also known as water marbling, is a fun and creative way to coat items in colorful spray paint designs. With just some spray paint, water, and an item to dip, you can create a one-of-a-kind work of art. In this comprehensive guide, we’ll cover everything you need to know to get started hydro dipping at home using spray paint.
What is Hydro Dipping?
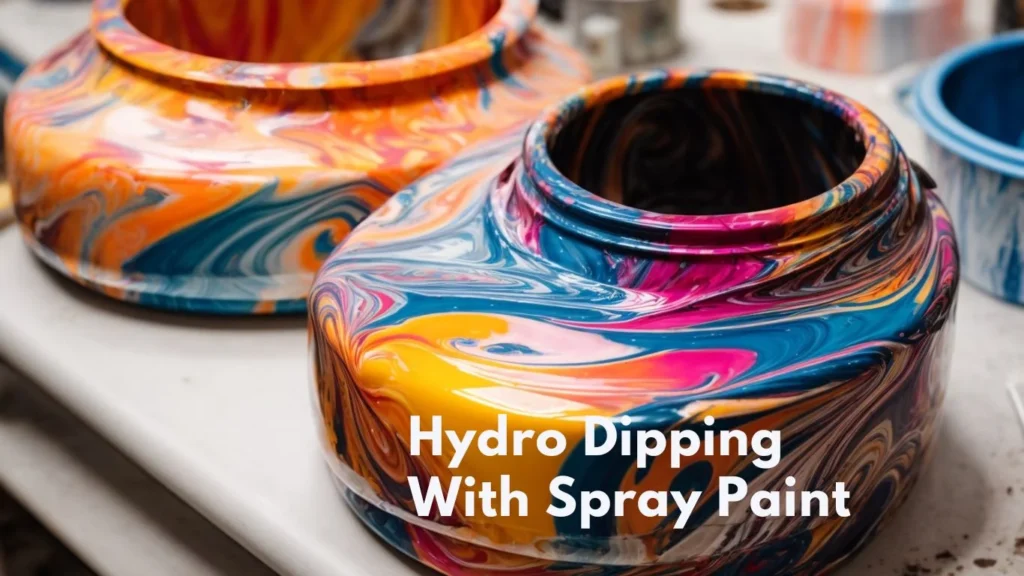
Hydro dipping involves dropping an item into a tub of water that has spray paint floating on top. As the item enters the water, the spray paint adheres to the surface, coating it in the paint design. This gives items a colorful, graphic look and feel. The hydro dipping process is also referred to as water transfer printing, water marbling, or cubic printing.
Hydro dipping can be used to customize and stylize objects made from non-porous materials like plastic, metal, glass, hard rubber, and more. Almost anything with a smooth, even surface can be dipped, including phone cases, controllers, car parts, tools, and accessories. The finished product has an organic, flowing design of colors and patterns.
Supplies Needed for Hydro Dipping with Spray Paint
Hydro dipping doesn’t require a lot of fancy tools or materials. Here are the basic supplies you’ll need:
- Spray paint – Enamel and acrylic spray paints work best. Stay away from paint+primer sprays.
- Plastic tub or tank – Look for something at least 6 inches deep and wide enough to dip your items. Clear plastic works best.
- Items to dip – Clean and prep your items before starting. Use a base coat if needed.
- Gloves – To protect your hands from paint. Nitrile gloves work well.
- Mask or respirator – For protecting yourself from paint vapors.
- Dowels, rods, or tongs – For dipping items without touching the water.
- Rags, paper towels, masking tape – For prepping, cleaning, and drying items.
That’s it for the basics! Now let’s go over how to prep for the hydro dipping process.
Preparing Items for Hydro Dipping with Spray Paint
Proper preparation is key to getting great results hydro dipping with spray paint. Here are some tips:
- Clean the surface – Wipe down items with rubbing alcohol to remove any dirt, dust, or oils.
- Use a base coat – For plastic, glass, and shiny items, lightly spray a coat of enamel spray paint and let fully dry. This helps the topcoat stick.
- Mask off areas – Use masking tape to cover any parts you don’t want painted.
- Warm items slightly – This helps the paint adhere better. Run under warm water or use a heat gun or hair dryer briefly.
- Hang or suspend items – Attach a dowel, rod, or hook so you can dip the item without touching the water.
- Wear gloves – Protect your hands and fingers from paint. Nitrile gloves work best.
Proper prep takes a bit of time but prevents paint issues like beading, uneven coats, and chipping later on.
How to Mix Hydro Dipping Paint
Mixing up the paint for your hydro dipping tub takes some experimenting to get right. Here are some tips:
- Use light misting spray paint coats – Slowly build up layers of color. Thick coats will bleed and murky the water.
- Spray in lines and waves – To get streaks and swirling patterns in the finished design.
- Use 5-10 colors – For depth and dimension. Contrasting and complementary colors look best.
- Alternate paint sheens – Mixing glossy and matte paint adds visual interest. Metallic paints add a cool effect.
- Let paint settle – Mist on paint then wait 20-30 seconds for it to spread evenly before adding more layers.
- Stir gently – Agitating the water too much makes the paint bleed and blend together.
- Add activator – A hydro dipping additive helps the paint float and stick better.
The paint on the water should have a vibrant, multi-colored swirl pattern before dipping your item.
How to Hydro Dip an Item in Spray Paint
Once your paint is prepped in the tub, you’re ready to hydro dip! Follow these steps for best results:
- Position the item – Gently lower the prepped item above the center of the paint-covered water.
- Dip smoothly – In one motion, immerse the item 1-2 inches under the waterline.
- Hold 30 seconds – 1 minute – Gently move the item side to side to cover it fully.
- Remove slowly and smoothly – Pull straight up and out at a 45 degree angle.
- Dry vertically – Move drips to the bottom and let the item dry in front of a fan. Don’t touch the wet paint!
- Apply clear coat – Once fully dry, spray with a clear acrylic sealant for protection.
Mistakes like dipping too quickly or moving the item around too much under the water will affect the finish. Get the dip just right and you’ll have an awesome hydro dipped creation!
Hydro Dipping Tips and Tricks
Here are some handy tips and tricks to take your hydro dipping to the next level:
- Base coat tricky items – Use a bright base coat on dark items so colors pop. Primer helps the paint stick to slick surfaces like glass or metal.
- Lift straight up – Any tilting or angles when removing from the water can smear the design.
- Work in a well-ventilated area – Have ample airflow to disperse paint vapors and fumes.
- Clean the water tub frequently – For crisp paint results, replace the water when it becomes murky.
- Try a wire rack – Resting items on a wire rack suspended above the tub allows for a quick, even dip.
- Tape off designs – Use masking tape to create shapes and patterns by blocking off sections from paint.
- Drip some paint colors – For a streaky, tie-dye look, drip extra paint in thick blobs directly into the water.
- Reactivate dried paint – Misting the paint surface with water allows you to spread and swirl the colors more.
Hydro Dipping Multiple Items
What’s great about hydro dipping is you can create multiples of the same design by dipping batches of items. Here are some tips:
- Use a bigger tub – Get a large plastic storage bin or even a small kiddie pool to fit more items.
- Create assembly lines – Have your prepped items lined up and ready for quick, successive dips.
- Stir paint between dips – Gently agitate the paint to keep the pattern even.
- Replenish paint – Mist on more layers of paint to refresh it after several dips.
- Work efficiently – Move fast from dipping to drying to seal coating your items while the paint is still wet.
- Clean the tub frequently – When doing multiple dips, clean the tub often to remove paint buildup.
Dipping items in batches helps streamline the process. Just be sure to work quickly from start to finish.
Troubleshooting Common Hydro Dipping Problems
When first starting out with hydro dipping, you may run into some issues. Here are some common problems and how to fix them:
Beading – Paint beads up and won’t adhere evenly.
- Use a smooth base coat and properly prep the surface.
Blotching – Paint looks splotchy and uneven.
- Gently stir the paint between dips to reblend it.
Bleeding – Colors blend together and murky.
- Mist on very light coats of paint instead of thick layers.
Chipping – Paint flakes off easily.
- Ensure item is clean before dipping and apply a protective clear coat after.
Dull finishes – Colors look lackluster.
- Use glossy or metallic paints. Replace water when it gets dirty.
Sticking – Item won’t detach smoothly from the water.
- Dip at a very slight angle and lift slowly and steadily.
Don’t get discouraged! Just take note of what went wrong and troubleshoot the issue before your next attempt.
Inspiring Hydro Dipping Projects
One of the best parts of hydro dipping is seeing the unique, eye-catching designs you can create. Here are some cool hydro dipping project ideas to inspire you:
- Phone cases
- Controllers
- Helmets
- Decor items like vases, lamps, and figurines
- Tools like pliers, clamps, or wrenches
- Outdoor items like gas cans or coolers
Hydro Dipping Different Materials
Hydro dipping works well on any item with a smooth, non-porous surface. Here are some tips for dipping common materials:
Plastic
Plastic is one of the easiest materials to hydro dip. For best results:
- Clean thoroughly with rubbing alcohol to remove any oils
- Lightly scuff glossy plastic with fine sandpaper
- Use a base coat like enamel spray paint to help the top color adhere
Virtually all plastics can be dipped – phone cases, controllers, models, decor, and more. The paint sinks into the micro-grooves nicely.
Metal
Metals like aluminum, steel, tin, and copper can be dipped with great results. Prepare metal properly by:
- Removing any existing finish or coatings
- Cleaning and degreasing the bare metal
- Lightly scuffing smooth metal with an abrasive sponge
- Applying a coat of plastic-bonding primer
Common metal items to dip include toolboxes, motorcycle parts, appliances, and more.
Wood
Natural items like wood can look fantastic hydro dipped in bold colors. With wood:
- Sand and stain or seal prior to dipping
- Use a primer like KILZ to help paint adhesion
- Test spray paint compatibility before dipping
Hydro dipping brings a modern twist to wood surfaces like cornhole boards, furniture, bowls, and crates.
Glass
For smooth glass, properly prepare it by:
- Cleaning with alcohol to remove residue
- Lightly abrading with fine sandpaper
- Applying a bond-promoting primer
- Warming glass before dipping
Dipped glass takes on an artsy, melted look. Items like vases, candle holders, jars, and ornaments work well.
Hard Rubber
Smooth rubber with an even finish like phone cases, tool handles, and modeling clay can be dipped.
- Clean rubber thoroughly before starting
- Use a base coat of spray primer for improved adhesion
- Don’t overheat rubber when warming before dipping
With proper prep, the paint will bond tightly for a durable finish.
Advanced Hydro Dipping Techniques
Once you master the basics, there are all kinds of cool hydro dipping techniques to try:
Two-Tone Dipping
Mask off part of an item and dip the exposed area first. Then dip the second exposed area in a different color scheme. Remove the masking and you have a two-tone design!
Patterned Dipping
Cut custom patterns out of contact paper or masking tape to block off sections. Or use rubber stamps to imprint patterns. Dip around the coverings to create unique designs.
Backdrop Dipping
Lay down a solid coat of paint as the backdrop before floating other colors on top. It adds depth and dimension.
Negative Space Dipping
Lay down masking fluid or glue on the item so paint won’t stick to it. When dry, remove it to reveal negative space shapes.
Over-Dipping
Dip an item, let it dry, then dip again into fresh paint for layered effects. You can create fades, splatters, and other cool looks.
With some creative thinking, the possibilities are endless for taking hydro dipping to the next level. Let your imagination run wild!
FAQs About Hydro Dipping with Spray Paint
If you’re new to hydro dipping, you probably have plenty of questions. Here are answers to some frequently asked questions:
What kind of paint works best for hydro dipping?
Enamel and acrylic spray paints are ideal for dipping. The colors spread well on water and adhere tightly. Stay away from paint+primer all-in-one sprays.
Do I need a hydro dipping kit?
Hydro dipping doesn’t require any expensive specialty tools. All you really need is spray paint, a tub of water, and items to dip. Activator solution can help but isn’t mandatory.
How do I get cool designs and patterns?
The key is layering different colors of spray paint onto the water’s surface. Spray in waves and lines and let the paint spread and swirl together before dipping.
What if my paint job comes out blotchy or uneven?
Make sure your item’s surface is ultra clean before dipping. Gently stir the paint between dips to reblend it. Use very light misting coats instead of thick heavy sprays of paint.
How do I avoid paint chipping or flaking off?
Properly prep the item’s surface so paint can adhere well. Apply a clear topcoat sealant when fully dry for added protection.
What can I do with hydro dipped items?
You can customize and stylize all kinds of everyday items: phone cases, tools, sporting equipment, car parts, décor, accessories, and more. Let your creativity run wild!
Hydro Dipping Safety Tips
While a fun hobby, it’s important to keep safety in mind:
- Work in a well-ventilated area and wear a mask or respirator.
- Wear protective gloves, goggles, and clothing you don’t mind getting messy.
- Avoid open flames or sparks near paint vapors.
- Wash hands thoroughly after handling paints.
- Properly dispose of waste paints without dumping down drains.
- Supervise children closely and don’t allow them to handle spray paint.
With some common sense precautions, you can dip safely while producing amazing works of art!
Ready to Try Hydro Dipping?
As you can see, hydro dipping with spray paint is an easy, artistic way to customize your stuff in eye-catching designs. With a few key supplies and following the techniques covered, you’ll be ready to start dipping like a pro.
It does take some trial and error to master the dipping process, but don’t get discouraged. No two hydro dipping projects turn out the same. Once you get the hang of mixing paints and prepping surfaces, you’ll be amazed by the vibrant, one-of-a-kind items you can create.
So grab your spray paints, put on some gloves, and let your creativity run wild hydro dipping all kinds of items. Dive into this fun hobby and make a splash with your amazing dipped designs!

